Well, I did it, got the Bradley and base finished before this year finished.
The title I've decided on this project, is "I'll see you back at home!". The scene is set after "Desert Storm" finished in 1991 and the Americans are heading home. Here the Bradley's commander is standing at the front and patting his ride while saying to her "I'll see you back at home!", whilst holding his M231 rifle along side his Alice Packs.
So now this project is done, it's onwards to one of the other on-going projects to get them finished. So the Mig-31 is close to painting which will have to be done at home, the Seafire is still in construction so that can come to work with me for now. The StuG III is ready for paint too, but the figures have to be built yet.
So a Happy New Year to you all and plenty of modelling ahead for you in the new year.
Well, onto the next stages of building the base for the Bradley.
After leaving the glue to dry for a few hours yesterday afternoon, the base was turned over and shook to allow any loose ballast to fall into the box. This was returned to its container for further use. The base was checked over for any bare patches, of which there was none. I then removed the masking tape from around the base bottom and cleaned up any glue and ballast that slipped under it.
I quickly place the Bradley model onto the base to get an idea of how it was going to look with them both together. This also checks for any bumps that might need adjusting.
Now into the spraybooth. First I laid down a few coats of the Iraqi Sand colour for the overall colour of the sandstone chips. Once I was happy with the coverage of this colour, a quick blast with a hairdryer on a low setting, was done to help reduce the drying time of the paint. Then the normal sand colour was used to highlight the raised areas on the base. This sand colour is a bit lighter then the Iraqi Sand colour, so is ideal for this job.
The final stages of the base build was to then tone down the general area with a little dirt colour. This is my own mix of paint using various browns from the Tamiya range. I keep this pre-thinned in a bottle ready for use in an airbrush to save having to mix a new batch up each time. I concentrated two lines for basically where several tanks/vehicles have been parked over time in this spot. Then a light general misting was done over the rest of the base to reduce the brightness of the highlighted areas. Finally, the base edge was finished off with some black paint, the pre-mixed kind in bottles for children to use.
So that is the base finished and all I have left to do is finish the figure off with the alice packs and his rifle. This will be the last update for this project and the next post will be for the completed project, hopefully tomorrow night.
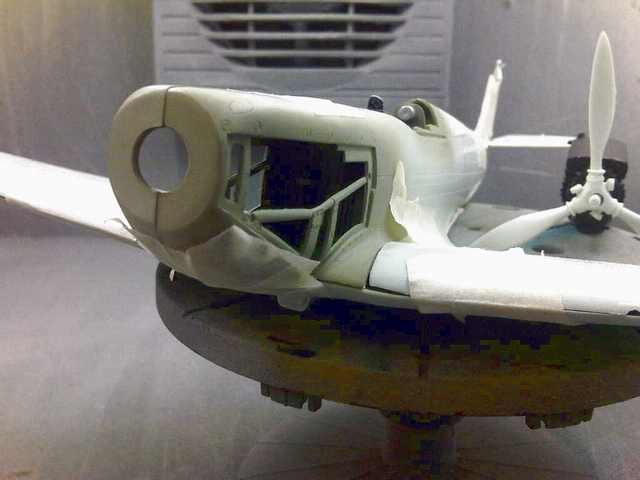
So, the Bradley is basically finished. All that's left to do to it is add the glass targeting disc, but that will be left until the end for safety. Now we onto the base for the model.
The base is made from a piece of routered MDF. Nothing fancy, this can even be made from leftover scraps. Once I had one in the size I needed, it was time to plan out what I wanted. My plan for this project is for it to be set at the end of the Desert Storm when all of the troops are heading home. The scene is the Bradley's commander patting the front of it say his goodbye to it. The figure came from the kit, so it is not too good compared to others available. The arms have been remodelled on the figure into new positions, the left patting the hull ans the right holding his M231 rifle barrel. The Alice Packs are from Tamiya's range of accessories.


Onto the base now. First some terrain needs to be created to break up the flat surface. I have had to use Plasticine this time, as the local model shop is closed for Christmas so I could not get any "Das" modelling clay. If I was doing a larger build up of terrain, then I would use car body filler. Using Plasticine is an experiment on this base, so I am not sure how it will turn out at the end.
I want a ridge of sandstone ballast behind the Bradley, so first the ridge has been built up with some Plasticine rolled out and then squashed into shape.
Next I added some smaller pieces around the rest of the base to break up the flatness of it. At this stage, I notice that the Plasticine would lift a little whilst pressing it down, so I'm hoping that the PVA glue and ballast will hold it in place.
As I know, PVA glue and Plasticine do not mix. So I decided to give the base a coat of car primer thinking this might solve the problem. Some masking tape was ran around the edge of the base, this is mainly to keep as much glue and ballast off the routered faces of the base.
Unfortunately, the primer method did not work! So a solution was needed to combat the PVA not sticking to the Plasticine! Answer to this, washing up liquid. I just put a few drops in to the glue and mixed it around on the base. It worked letting the glue cover the Plasticine without any trouble.
Once everything was covered with the PVA, I placed the base in a box (the lid of the Bradley kit in this case) and started to sprinkle the fine grade ballast all over the base. Make sure everything gets a good covering and if you see a damp patch starting to show, at some more ballast.
Now this will need to be left for several hours for the glue to dry. So this is the end of this update and the next stages of the base construction will continue later.
Nearly there.
Yesterday, I set about weathering up the Bradley. This project throughout has been a test bed for me to try out some new techniques. The first being the salt weathering on the paint, of which I learnt a lot from it and know what to change the next time I use that method. The next method was weathering with oil paints.
After reading up on a few articles in magazines and on-line, I cracked ahead with it yesterday. My aim was to darken up around the armour plates and add some rust streaks to bolt heads, etc. I started with two colours at first, Burnt Sienna and Burnt Umber. The Umber was used in the gaps between the plates and around the hatches. Then I mixed the Sienna with Umber to make a dark rust colour for use on the bolt heads and other areas prone the be affected by rust. The method I chose to try out was to place a spot of paint in the required place, then use a brush dipped in turpentine and dried to drag the paint in the direction I wanted it to go. After the first few done, I was pleased with what the result was and carried on with the rest of the model.
Next I got some Black oil paint out and mixed it with the Burnt Umber for a greasy look and brushed some streaks from the nuts and centre hubs on the Bradley's wheels. This was the last of the weathering I planned to do with the oils on this project, so now onto the rest of it. Recently I picked up a set of enamels and pigments from AK Interactive. These include track wash, fuel stains, engine grime and engine oil in the enamels with track rust and dark steel in the pigments. I started with the track wash on the tracks plus the spare ones on the hull. Next I ran some of the fuel stain around the fuel cap hatch and ran it down the side of the hull where it had been spilt. When these were dry, I used the rust pigment on the spare tracks and around some of the hinges. The next thing was to get some Promodeller Black pigment out to use around the exhaust exit and on the TOW-2 Missile for soot.
I finished off this stage with a dusting over of Iraqi Sand paint from Vallejo through the airbrush. I concentrated mainly to the lower half of the hull then light dusted over the top. When this was dry, I got an emery board and rubbed over the rubber sections on the tracks to bring them out, just as if it had been driven on a road. Just got a few little things left to do on the Bradley now. The aerials need painting, a little more rusting in a couple of places and a new barrel made for the machine gun. I broke it off at some point and can't find it. Next its the figure to be made and painted, then the base for them to stand on.
Now with the Hawk T1 finished and the Bradley in the final stages of the project, I had to decide which of my other "On-hold" projects to carry on with. There was this old Revell 1/32nd kit of the Supermarine Seafire Mk1B that I started earlier this year and has been sitting on the shelf for about six months. So I decided to dust off this project and get it finished off.
I was having different ideas when I started this project, like having it just after take-off with the gear coming up. But even now I still have not decided what to do, even what colour to paint it is still not decided.
The first six photos below were taken in the early stages of the project when dry fitting using masking tape. The cockpit interior was built but not glued in place. Since these were taken, the fuselage has been glued together along with the wings. One thing that was noticed during the dry fitting, was that there was no support for the upper main wing sections to the fuselage. This has hopefully been sorted by gluing some plasticard to the upper wing panels, this will also give some extra support for when the model stands on the undercarriage.
I am also doing some small modifications to other areas of the model to improve the finished look of it. These include the mountings of the aerolons, tailplanes and rudder. The hinging points on these were terrible. The last two photos below were taken tonight prior to me doing this post to show the current stage of the build as I get ready to re-start the project.
Just a little update on this project.
I added the decals that were printed off. The black inverted V's and badge went on without any trouble, I did mess one of the V's up but it was a good job I printed three sets off. The trouble was when I went to apply the ID plates to the model. These were a bit transparent mainly due to the editing of the image and being printed on clear paper. My first thought was to reprint the plates on white paper. But then I decided to try using the ones already printed off.
I opted to lay the ID plate decals over a piece of white paper already in position on the model. So some measuring of the plates was done and five white panels were measured out onto the white decal paper then cut out. First I laid the white panel in position on the model then whilst still wet, laid the printed ID plate on the clear paper over the top of it.
After doing the first one, I looked at it and thought it was a little faint. But after a few minutes thinking about it, that will be ideal for a worn look. Anyhow, with a bit of weathering to the model, it would be faded anyway. So I continued with the other five plates to finish this stage of the model. Now to get started on weathering the Bradley and the final details on it.
Merry Christmas to all and a Happy New Year.
Normal service will resume soon, once Christmas Day is out of the way. Also with having a few days off, I might be able to get some modelling done and catch up on the club website.
Okay, it's been a couple of months since I last did anything with this project. The Hawk and Intruder had to take priority over the Bradley due to the decal problem I had with it. Now for a push to get it finished before the end of the year now I've got a week off work.
After some searching around the internet, I found a couple of sets of decals for the right period of my Bradley. So they were both downloaded for me to edit for fitting my Bradley. One set was for an Academy 1/35th scale kit and the other was for Revell's 1/72nd scale kit. I chose to go with the latter as they looked the better of the two and I had access to the instruction sheets via Revell's website.
I started altering the various settings of the image using a photo editing programme to remove the background colour of the decals backing paper. Then after printing off a test sample, I could use the instruction diagrams to work out the position of one of the "V's" on my model to get the size of it. When this was worked out, I altered the dimensions of the image by measure the "V" on my sample print and the total size of the image. The image was scaled down to the correct size required for my model.
Once this was done, using Firefox, I started to go over the two "V's" and the badge to restore the quality of them after they faded from the earlier editing. This was done pixel by pixel, a bit of black here and there, some white here and there too. After several attempts at this, I was happy with the result, even though it's not perfect, but these were stencilled and either sprayed or brushed on the 1:1 examples. Three copies were set out for printing and after a test print on normal paper, I printed onto the decal paper at the highest setting on my printer. Once dry, a couple of coats of Plasticoat Acryllic clear was sprayed over the printed decals and are now being left overnight to dry ready for tomorrow.
Another update hopefully will be done tomorrow or over the next few days.
It's amazing how time flies by, I have not done any work on this project for a week now whilst at work, other things occupied my time when parked up. So tonight I realised there had not been any updates posted on the progress so far since the last one.
Now, the other mud splash guard has been fitted to the hull along with the parts that will be painted in the same colour as the hull will be. I noticed whilst taking these photos, that one of the headlights has been knocked off in the box, so a quick rummage around is needed to find it. The etched grills over the air intakes have been added to. The etching on these are very nice and are a great touch compared to the injected plastic parts in the kit. There is a long section of channel that sits above the air intakes, not sure what they are for yet, so some more research needed. One side is mounted on its etched supports and the other one is still in the progress of construction prior to fitting.
It should not be too long before painting starts on the hull, there is only a few more parts to go onto it. Items like tools and the barrel cleaning equipment will be fitted after painting. Mind you, the next major construction work on this is about to start, that is the tracks. My past experience with Dragon's "Magic Track" was not a good one. It was on my M1 Panther 2 Mine Detecting & Clearing Vehicle, they did not stay together when assembled. In the end, I had to glue them together in sections and fit them in position on the hull. After I did this, a friend told me about some aftermarket tracks I could have used instead. So we will see how these ones go together over the next couple of weeks. I must remember to keep the two sets separate as they are handed left and right.
The figures also need to be made up. This I do not mind, but it is the painting of their faces I still need to master. A little help in the form of some lessons from David Scott down my club might be required for this. So here are a few photos I have just taken showing the progress so far. Oh yes, and I need to stick the hull in a plastic box whilst taking it to work with me. Now where is that headlight!
I have just created a chat page on Facebook for fellow modellers to chat about their models, kits, tips and general problem solving. We can chat to modellers about current build projects and post photos of them as they progress. It can be used to promote the hobby in general and encourage younger people into it.
The page has only just been set up, so give me a couple of days to get some photo albums created and general structure of the page. So lets get chatting and spread the word about this great hobby that we all do.
Here is the direct link to the page.
The Mechanic's Modelling Chat Page
Mick
I finished her tonight, added the final decals to the undercarriage gear and doors, and the missiles before fitting them. That has now given me a weeks grace of completion for the club competition next Wednesday.
Just to give a little light into the club competitions. We have a competition each month based on different themes for each one. The competition runs from the May of each year to the following March with points given for entry and the top three places each month. This is done by the members present at the meeting that night voting for their three favourite models entered that night. April does not have one as it is the clubs AGM and when the trophy to the winner of that year.
This months theme was an Airfix kit in either 1/72nd or 1/76th scales for under £10.00 retail price. I first had a Curtiss SB2C Helldiver, but there was a part missing in the kit. So I then picked up the Hawk to replace it. So a quick run down of this model. It was built straight out of the box, no added detailing, the main paints used were Xtracrylix XA1015 RAF Lt Aircraft Grey and XA1012 Night Black. Other various paints were used on the model too during the construction. I didn't want to have a very glossy finish on the model, I like to have it in a used state and a little dull. It is a nice model to build and went without any problems, but I also have an Airfix 1/48th scale Red Arrows Hawk and an Airframes limited edtion Hawk T1A in my stockpile to build.
So, lets see what happens next Wednesday night and here are some photos of the finished model.
I think I'm going to make it and finish this model before the deadline a week Wednesday. Progress has been better this week then I thought it would be. As of this point in time, all that's left to do is finish the undercarriage doors, paint and add the missiles and carriers, add the main canopy and a couple of more decals. If I'm lucky, it might get finished either today or tomorrow. I'll just have to wait and see.
Now one little grumble about this kit Airfix, please put in the instructions about painting the inside of the main undercarriage doors to correspond with the colour scheme that you're building! Instruction state to paint them all RAF Light Aircraft Grey, but the version I'm building they're BLACK! This is not stated until the painting and decal placement instructions. That's my only gripe so far with this kit.
So here's some update photos for you.