Saturday 30 June 2012

P-47M Thunderbolt "Wolfpack" WIP #03

Time is a funny thing! You need time to work, time for family stuff, time for doing things around the house, time to sleep and time for yourself. But there is just one little problem, there is not enough time in the day for all of these things!


Due to this lack of time, mainly cause by work taking up too many hours during the day, my modelling has suffered a little over the last couple of months and general progress on projects has been slow. My P-47 Thunderbolt has taken a few more steps forwards now. The main construction work has been done, the fuselage is assembled along with the wings and I have even started to paint the bird. The colour scheme I have gone for is the Matt Black upper surfaces with bare metal below. So out with the Alclad and the use of various shades of Aluminium. My original plane was to start with Airframe Aluminium all over and pick out the odd panel with other shades. But I changed my mind and went for Duraluminium as the general colour, then pick out the panels with other shades. 


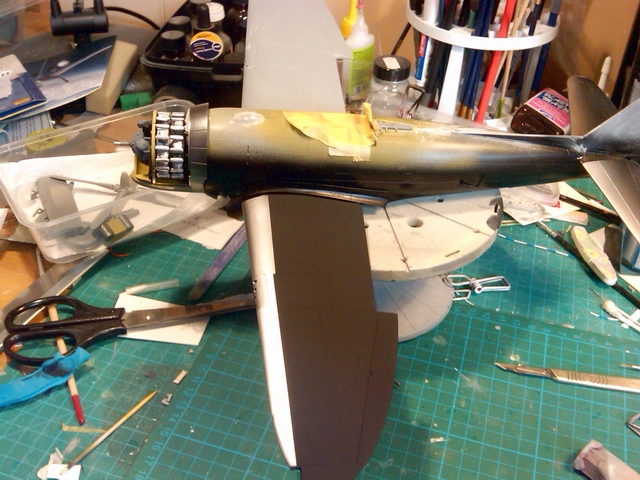
I am painting this model in separate sections, i.e. wings, fuselage, cowlings, etc, to get the Alclad right. You can see in the above photo that the left hand wing upper surface is already in Matt Black. I found that it was easier to mask up the wing for painting the separate panels and upper surface not attached to the fuselage. I will be doing the same with the other wing and tailplanes as I go along. The engine covers and cowling are being painted in Alclad first and when the fuselage has had the same treatment, I will be dry assembled for masking prior to the Matt Black.


Here you can see the lower engine cover and the cowls already painted with Alclad. All of the cowl panels and engine covers are painted with Alclad to allow worn areas of paint to show the metal finish below. Most of the painting on the engine has been done, only a bit more weathering needs to be done to in now to finish it off.


The underneath of the wing shows the difference in the Aluminium shades that have been used. The undercarriage bay will need to be repainted and weathered before final assembly of the model. Panel lines will also be picked out and staining from the guns once the decals are added.

Tuesday 26 June 2012

Airbrush & Model Cleaning Brushes


Here is a little tip for all you modellers out there.


I found these little brushes in a chemist down town that are used for cleaning between your teeth. They come in a range of various sizes and in the case of this manufacturer, a plastic cap that doubles as a handle for when you use the brush. So I got thinking could I use these and brought myself a pack of 0.4mm brushes, the pink handled brushes on the right to try out.


My first idea was to used them for cleaning my airbrushes. I already have some brushes specifically for this purpose, but there at times where these are either too big or small depending on which airbrush I am cleaning. Now these brushes are not as stiff as the proper brushes I have. The shaft is more flexible and the bristles are much softer, but they are shorter too. So these are ideal for if you are just doing a quick clean of your airbrush without a full strip down. Only take out the needle and remove the tip then use a brush of the required size to give the inside a quick clean out.


The second idea I came up with is for cleaning me models. You know how you get dust trapped in places that you cannot get to with a cloth or paintbrush without the risk of damaging the model! These brushes are the perfect thing for cleaning these delicate areas of dust and dirt. With the bristles being so soft, in various lengths and the flexible shafts which will bend to a curve to ease cleaning, makes them ideal for cleaning your models without damaging them. That is unless you are rough handling the model whilst cleaning them. 


I picked these brushes up in my local Bodycare shop and they only cost about £3.50 from what I can remember. You might find them cheaper or more expensive in other shops, but this might also depend on the brand too. But do not get them from your dentist, they will cost you a fair bit more.


Monday 25 June 2012

It's Arrived! My SWS P-51d Mustang Kit

I had a nice little present delivered to me today by the Postman!


It was the Zoukei-Mura SWS P-51D Mustang kit that has just been released.


So far, I have only had a good look at the instruction book so far, and I tell you what, this is a very very good kit. This is the first kit from the Super Wings Series that I have ever brought, it has impressed me well past my expectations. I have seen the earlier kits that David down my club has built, but never really had a good look at the parts or instructions.


I took this photo of the packed sprues next to the box, should have spread them out a bit more but I was standing on my workshop chair to take this photo. But just to give you a taster of what to expect in the box. You have the option of three different aircraft to build, including Capt. "Bud" Anderson's aircraft "Old Crow". The detail on the parts are, well, fantastic! For instance, the engine has all the cylinders in each bank on the block. There is just too much to list on the detail side of this kit, it would take me along time to tell you everything. All I can say, the only this missing is the wiring looms, it is truly a scale model. Out of my collection of un-built kits, I place it on the same level or higher as my Airfix 1/24th scale Mosquito.


Just to finish this posting off, here is a photo of one of the instruction pages for the engine assembly. Very detailed instructions for you to work from.


Saturday 23 June 2012

MAFVA Nationals, IWM Duxford Follow Up

I was planning to write this at the beginning of the week, but a couple of late finishes and evening commitments has stopped me from doing this.


So, onto last Sunday. Well the rain stayed away for the day and with the damp ground underfoot, we did not have to suffer from dust being kicked up onto the models in the marquee. We had a good turnout on the club stand this year, nine club members and my grandson Kyran. I had a little worry in the days leading up to the show that there would not be enough models to go onto the club stand, so I packed a good selection including my KV-1 diorama. But I had not need to worry about this as there was a good selection brought by fellow members.


My plan was to try and take plenty of photos of models on display along with aircraft and armour in the museum, but Kyran had different plans! So we spent a vast period of the day running around mainly the American Forces Hanger for Kyran to look at these aircraft. And for him to do some posing for photos in front of them, he just loves being in front of a camera as you will see below.


At least with Kyran wanting to spend time in this hanger, I could spend time to get some detail photos taken of some of the aircraft in my stockpile of un-built kits like the B-52 Stratofortress, B-24 Liberator and B-29 Superfortress, just to name a few. I got some great shots like this one below of the B-52's front undercarriage bay and gear.


My plans for photo taking were soon changed by Kyran again! wanting to go off to explore behind the hangers, he discovered the vehicle speed detectors on the access road that run along behind the WWII hangers. So now starts the new sport of "Can I break the speed limit?". This consists of running towards the detector trying to register a speed on the display. For an eight year old, he was constantly hitting 11MPH with a few time clocking 12MPH. I was made to do this myself and did a measly 13MPH, but try running with a SLR camera hanging around your neck! As Kyran continued with his new sport, other children joined in with it and a few parent too. One father especially embarrassing himself with a slow 7MPH. After half a hour of this, I managed to drag Kyran away but only to end up back here two more times during the day.


Out on the airfield, this were a little quiet with just a few private aircraft popping in and out, and a Harvard taking off. The usual flights of the Tiger Moth were going ahead, but the De Havilland Dragon Rapide was having engine troubles so there was no flights with it. 


But my highlight of the day was watching the two seater Spitfire take off for a flight and then return a short time later. I missed its fly past where it rolled above the airfield, that would have been a sight to catch. So to finish this entry off, here is a few of the Spitfire taking off last Sunday.


Wednesday 13 June 2012

MAFVA Nationals, IWM Duxford

This is the big question for this weekend, "Is it going to rain?". Myself and a few hundred others are praying that it stays dry from now on to allow the ground to dry out ready for the MAFVA Nationals that are being held at the Imperial War Museum Duxford.


This is my fourth time visiting there with the club and it is a good day out. Along side the model show, there is a military vehicle show held next the the shows marquee where you will see many different types of military vehicles on show. The entry fee covers you to visit the model and military vehicle shows, but also the aircraft display halls and the tank museum which are part of the IWM Duxford. 


It is a full day when you visit this weekend, but it is well worth the money spent. Adults entry is £17.00, but under 16's get in for free. The kids will love it, my grandson did last year, especially the tank ride and climbing inside a few of the aircraft on display (even managed to get in one closed to the public). But don't take my word for it, check out the links below and the video of some RC Tanks and the Armoured Personnel Carrier used for the tank rides.


Monday 11 June 2012

Slow Times In The Workshop

It's one of those periods of time at the moment, I seem to spend time in my workshop but not much is getting done! It has been like that for the last couple of months, my projects are progressing very slowly, in fact, way too slow for my liking. There has also been a lack of time sitting around at work on loading bays recently too, 


Mind you, I did get three models finished last week during the weekend, but there were not mine, just some of Kyran's models that had been sitting around for a while part-built. He's my eight year old grandson that a few of you out there know or have met at a couple of shows. I still have his Star Trek spaceship and Dr Who Tardis to finish off at some point in the future.


So where am I at this moment with ongoing projects in the workshop?


Well, my P-47 Thunderbolt is very close to getting the painting started, so out with the Alclad first then matt Black on top. My StuG III needs more weathering and clutter added to the hull. The figure have to be finished painting too and the base is a long way off from completion. Now onto the 49 Mercury, it has got the bodyshell painted but needs another couple of coats of clear before polishing up. The interior needs painting once I have decided on what colours to do it in. The 53 Chevy BelAir, well, that is at a stall for now. I have a new axle for this model, but need to modify it and transfer the sway bars, brakes, etc. to it. This is a long term project though and is developing as it progresses.


I need more free time. Retirement is too far away at the moment for me, unless we win the lottery, inherit a nice amount or some kind person gives us a big cheque for nothing!


Any offers?


F6F-3 Hellcat Finished


Well, after about eighteen months on this project on and off, I have finally finished my Hellcat. Over the last month I made a push to complete her and try out some new weathering techniques, with a very pleasing result. 


Eduard has come up trumps with this kit, she went together without any trouble and was a total joy to build throughout the project. The model was built straight out of the box, including the etched detailing set that Eduard supply in the kit. There was a few of the tiny levers in the cockpit that I left off, as they would not really be seen and were very awkward to fit them. Another little gripe I had was the Browning machine guns, you have to fit them as you assemble the two wing halves and the result is they get snapped off during the remaining build. So I had to make two new barrels out of plastic rod once the model was painted and weathered.


The main paint I used on this model was Mr Hobby's acrylic paint as to the kits instructions. I have slowly been building up my range of these paints and finding them great to work with. Once the base colours were down, I gave the model a couple of coats of Johnson's Klear before applying the decals over a few nights. These were sealed with a couple of coats of matt varnish from the Xtracrylix range. I noticed that the pre-shading was not showing up through the blue colours and the decals, so I decided to go over these areas again. After some experiments with various paints which resulted with the airbrush clogging up, I tried a wash mix using oil paints and turpentine. This did not clog up my airbrush and dry to a matt finish on the model. 


The rest of the weathering was done with a small piece of sponge dipped in Aluminium paint and dabbed around the fuselage to create a chipped paint effect. The main exhaust areas were first given a few brush strokes of soot coloured paint and then finished off with some Carrs weathering powders. The powders were also used for the smoke streaks off the machine guns and on the undercarriage legs and bays. Grime around the engine, fuel stains on the filler flaps and oil leak streaks were done using washes from the AK Interactive range. To finish off, I gave the model a light airbrushing using one of my own dirt wash paint mixes I made myself.


Now, how do I finish this blog off! If you haven't already got this kit in your collection, then get one. For a model to build straight out of the box, Eduard hit the spot perfect here. I will get another one of these kit sometime soon, especially now as there is some great aftermarkets items to go with this kit. These include a fully detailed engine so you can display it with the cowling removed and a set of folded wings just for this kit. Remember, there are five different options of aircraft in this kit, so a great excuse to buy five of these kits! And get in trouble with the wife.....