I am afraid that there has not much of an update on this project for the last month or so. But due to a recent death in the family and the illness that occurred prior to it, updating my blog has not been a priority. I have been working on the Corsair's and a couple of other projects just to keep my mind busy whilst this family thing was going on. So this will be the final posting on the Corsair's project as they are now completed.
First inn this post, I will start with display base, even though it was painted after the aircraft were done. Once the aircraft were finished, mounting them to the base was to be the final stage of the project. I first thought about permanently mounting them to the base, but decided against this for a few reasons. The main one the size it would be and it will not be able to go on my shelves, meaning the display would have to be kept in a storage box.Next, I would rather have the models separate from the base for safer transportation. Another is the final weight the display would weight once the plinth was added to it, this also adding risk during transportation to and from shows.
So, once the final positions of both aircraft and the tug were decided, a hole was drilled in the base for the power plug of the motorised Corsair to fit through. Next I laid down some wide masking tape and marked the locations of the wheels of the aircraft and tug. Holes were drilled for pins to fit through which were trimmed and glued in position on the base. Holes were now drilled in the models to allow them to sit on the locating pins sticking up through the base stopping them from moving around.
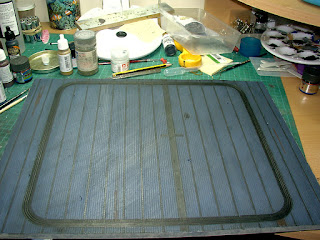
The base edge was masked up and the upper surface was given a coat of primer ready for painting. After doing a bit of research, I managed to find out what colours the US Navy did the carrier decks during this period. I opted for the one called Norfolk 250N Blue Deck Stain, then search through a few more websites to find out which model paint was either a match or close to it. This turned out to be Vallejo's WWII Luftwaffe Uniform Blue, which I luckily had in my draw. I airbrushed this colour over the deck, then picked out a few planks with various shades of this blue and wood colour. The metalwork on the deck was painted with Mr Metal Color Iron and buffed up once it was dry. I finished off the deck with a wash over using a mix of black and umber washes. Now to finish the base, I need to make the plinth which will be happening soon now that I have the materials for it.
Final assembly, detail painting and weathering continued on both models with the non-motorised Corsair being finished first. Both models were given a couple of coats of gloss clear before starting on the decals. As both kits came with the same decal sheets, I needed to find some more decals with just numbers and letters. I did have a set, but these were the wrong style and after some search on the internet, I came across the correct style (well, as close as I could find for this era) and ordered them. The motorised model was done as in the kit, and the other one was done in the number of another aircraft from the squadron. Both models now were given a coat of matt clear and then I touched up the pre-shading were it had faded away and over the where the decals sat.
The folding wing hinges have both had metal pins as they are delicate and both broke during the build process from handling. Once I had completed all of the main weathering and detail painting on this model, final assembly of the Corsair was completed with installing the pilot's seat along with the "Super Fabric" seat belts from Eduard, which I think are a god send as they are so much easier to work than the etched ones. The final parts to be fitted were the cockpit canopy and the outer folded wing sections with their support bars glued in place. I did a little bit of touch-ups where needed and a tiny bit more weathering to finish this one off.
Attention now turned to the motorised Corsair where the process was the same as the other model, but without the fitting of the folded wings. The only main difference with this model was that there was going to be two figures on it. Each kit came with two pilot figures in them, one a seated pilot and the other standing on the wing. In the Corsair and tug kit that Tamiya produced, came with an additional seated pilot posed in a different position. I decided to use this seated figure mainly because of how he was posed, but also because detail on it was miles better than the standard seated pilot. Once both figure were painted, they were added last of all to the aircraft, seated pilot first followed by the standing pilot on the wing.
So, after 28 months of this project developing and taking shape, aside the house move at the end of 2014, the Corsair's are finally finished. In all, I am very happy with how they all turned out and it is just how I imagined it was to look. So these are now ticked off the to finish list and it is time to decide on what other old project hidden away should be resurrected for completion. Enjoy the photos of the finished display below.


No comments:
Post a Comment