Hi All
I would like to wish you all a Merry Christmas and a Happy New Year.
Happy modelling in the new year and I hope you get the boxes of plastic that you want under the tree.
Mick

My Blog for updating progress on current "Work In Progress" modelling projects, general news and chat.
Monday 24 December 2012
P-47M Thunderbolt "Wolfpack" WIP 05
There has been progress!
It may be slow at the minute, but other things in life have been getting in the way of modelling this month (work was the main cause). So, progress as of last night.
All of the wings are painted, with both Gloss Black on the upper surfaces and various Alclad's underneath. The nose sections and the rudder have had the required areas painted Red. Over the last couple of evenings, the undercarriage bays and doors, flap recesses on the wings and all the engine area have all been masked and sprayed with Interior Green.
Other various items like the tail undercarriage, main gear wheels, belly tank and wing pylons have also received their various colours of paint or Alclad. Now some more construction has been done which include assembling the tail undercarriage and fitting them to the fuselage along with the tail planes. I was hoping to have the main wings glued in place to, but a crack in the joint on one of them has left me the need to repair it and touch up the Alclad painted panel. This might get done tonight or over the next couple of days.
So, once the crack has been repaired, there will be a few more items that need to be painted with Alclad, so they will done at the same time as the wing. The cockpit canopy also needs to be started on to. There is two reasons for this, 1, it needs to be done with Alclad after the Interior Green and 2, I need to make a mask for the fuselage section behind the cockpit with it.
Anyhow, here are a few more recent photos to keep you updated.


Saturday 15 December 2012
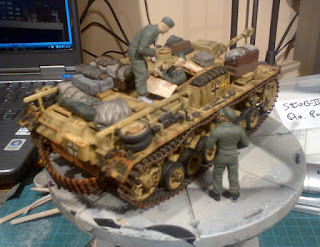
StuG III Diorama Finished
I took some photo's of the StuG III dio the other night for my website. As I still need to finish off the webpage for this, here are a few photo's that will be going up on the website in the next few as a taster.
I will post on here when the page is done.


I will post on here when the page is done.


Grumman F6F-3 Hellcat Added To My Website
My finished Eduard 1/48th scale Grumman F6F-3 Hellcat has been added to my website. It has been built in the markings of Lt. Alexander Vraciu when he was a member of VF-6 on the USS Intrepid in February 1944.
Grumman F6F-3 Hellcat Gallery Page

Grumman F6F-3 Hellcat Gallery Page

Tuesday 11 December 2012
Website Update
My website has been updated today.
The gallery Page for my Lockheed SR-71A Black Bird has been added to the website and the Stocklist Page has been updated to.
Mick's Modelling Website
Lockheed SR-71A Black Bird Gallery Page
The gallery Page for my Lockheed SR-71A Black Bird has been added to the website and the Stocklist Page has been updated to.
Mick's Modelling Website
Lockheed SR-71A Black Bird Gallery Page
Finished Aircraft Models Page Updated
Some new photographs of my 1/72nd scale model of the Lockheed SR-71A Black Bird have been added to this page.
Completed Aircraft Models
Completed Aircraft Models
Friday 7 December 2012
Eduard's Bunny Fighter Club

Yes, I had to get one.
This is just something completely different from the norm, as well as being a bit of fun. But there is a good reason to buy this kit. The benefits of the club membership!
The kit is Eduard's Profipack edition of the MiG-21MF, along with the Brassin interior and wheel sets.
So what else do you get I hear you ask?
Well, a great Bunny Fighter Club T-shirt, 15% off items from Eduard's store, special edition kits and detailing sets, loyalty price bonuses and free entry to the E-day Model Show. And this is for life to.
So, this will be started soon along with the two Airfix Camberra PR9's I brought to complete the trio of the 39 Sqdn aircraft in 2006.
P-47M Thunderbolt "Wolfpack" WIP #04
Now that my StuG III diorama is finished, it was time to finish off one of my many other ongoing projects. A few of them are ones that will take some time to finish them due to the nature of the builds. So I have decided to dig out the P-47 for working on at home as the main work to be done at the minute is painting.
So, over the last few nights, I have been spraying some Alclad on the underside of the fuselage before masking it off along with the wings to spray them with some Gloss Black. The actual aircraft was painted in Matt Black, but I used the Gloss just for laying the decals on it before finishing it off with some Matt Varnish. The tail and the engine covers still need to have some Red airbrushed on them before I start on the decals. There is also a few other items that need painting first before I fix the wings into place on the fuselage and start adding decals.
Hopefully there will be a good bit of progress on the Thunderbolt over the weekend so I can be ready for detailing things next week.

Sunday 2 December 2012
StuG III WIP #12
This is a busy time of the year for me. I have the Nationals at Telford, several birthdays including my own and my wedding anniversary all within a few weeks. So modelling has suffered a little this month.
One good thing about going to Telford, was the chance to get hold of some clutter to go onto my StuG III model. I picked up some sets from Value Gear which are very good. Also I came across some nice little cheap sets from a company called KV Model. They do a variety of crates, bags, drums and other unusual items, like chopped logs with tree stumps.
So, back to the StuG's progress. Now that I have the various bags, crates and tarps, painting started on these items. I was quite pleased how they came out in the end after doing a black wash to tone them down. Sorry for the photo quality, they were quickly taken the other day on my phone.

I have now added some lumps of mud onto the hull of the StuG prior to giving it a go over with the airbrush. One of the ways I make my mud, is by mixing some scenic scatter in with some paint and apply the lumps whilst wet. These are left overnight to dry in place before weathering with the same colour through the airbrush.


Here I was playing around with the positioning of the bags and crates to where the figures will be standing. These are not the final placing for the clutter, but they have been glued in place since this photo was taken.

The next update on this project will be when it is finished. So far the figures are painted and more weathering has been done to the StuG. Now I just need to finish off a few bits and pieces on the tank and dio base, then it will be done.
Wednesday 14 November 2012
IPMS(UK) Nationals 2012
What a weekend!
I have been going to Telford since 2007, so this was my sixth weekend at the show and I can sum it up with just one sentence.
"This was bloody the best one ever!"
This year, the show had expanded into the new hall allowing more space for clubs, SIG's and traders. The kit-swap got moved into the old entrance foyer and the competition tables moved to the new hall where the lighting was so much better. We were in hall 3 and next to our stand was the nose section of a Shackleton MR1 and a Royal Navy Lynx HMA.8 helicopter along with its crew which was flown in on Friday morning. Also in the hall was a French tank courtesy of Meng (sorry Thierry, I cannot remember what type it is) and at the far end was a Daimler Dingo Scout car and a Valentine DD Tank.
My plan for the weekend was for Saturday to be spend doing my main shopping during the morning, followed by visiting other stands and catching up with friends from around the country. Sunday was to finish the last bits of shopping then continue with the wandering around the halls. Even with us arriving on Friday afternoon instead of Saturday morning, there still was not enough time to visit everyone who I wanted to see this weekend.
By the time the show came to a close on Sunday afternoon, the general opinion of everyone I spoke to was that this was the best show the IPMS(UK) had put on in their history. The thing people were wondering about was how could it be topped next year! How about a P-51 Mustang or DH Mosquito?
So, after our journey home and dropping Matt and Richard off at their homes, I arrived back at my house and was greeted by my wife and grandson who's first comments were, "I hope you didn't spend to much?" and "What did you get me?". Home sweet home and glad to be back there!
All that's left to do for now is post a few of the photographs I took over the weekend.


Monday 5 November 2012
Telford, Here We Come!
It's that time of year again, when hordes of model builders descend upon Telford for the IPMS(UK) Nationals.
This is my sixth year at the Nationals, all thanks to Milton Keynes SMC for encouraging me to join the IPMS and go to the show. As well as the joy of catching up with friends from around the country and overseas that visit the show, it is also a time for seeing modellers new builds on display and a chance to spend some money, again!
Yet again, I will try my hand in the competitions. Just entering three models this year, its been a slow year for completing any of my competition models. The usual things like work, family life and DIY get in the way of modelling. But that's life for you! There is always next year in which to finish them off for.
If any of you are planning to visit the show, just pop along and say hello. I will be on the Milton Keynes Scale Model Club stand in hall 3. We will be virtually opposite the nose section of the Shackleton Mk1 and Lynx helicopter. Just pop along and ask for Mick, if I am not there, someone will know where I am or give me a shout.
IPMS(UK) Scale Model World
SR-71A Black Bird Finished
Well, this must have been one of my quickest builds ever, done in just over two weeks. Mind you, there was only one colour to paint on the fuselage, so this saved a lot of time.
In general, a pleasing build and one that took me back to when I was a teenager when I last build a SR-71, a Revell kit I think it was. This kit, an Academy one, went together without any problems. Masking up the cockpit canopies was a bit tedious, but I pushed on to complete it. One little mistake I made was to sand off the lights on the top and bottom of the fuselage, this still needs to be rectified.
The instructions state the fuselage is Black, this is incorrect. SR-71's are actually a very, very dark Blue, nearly Black. So, after seeing the one at IWM Duxford a few times and comparing photographs, I opted to paint the fuselage with Revell's Tar Black. This seems to be one of the closest paints I have in my stock and looks okay.
The Black Bird is another model on my list to have photographs taken for my website. So for now, here is a quick one I took with my phone so you can see it.

Website Update
I have just been doing a little update on my website.
The gallery page for the M2A2 Bradley has been added, I was lucky enough to have some good photos of this model to use on the website. Other pages updated include Links and Stockpile pages.
Once I have got the IPMS(UK) Nationals in Telford out of the way this weekend, I will have to crack ahead and get some photographs taken of my completed builds that have not been added to the website. There is also a couple of models that have temporary photographs on their gallery pages that need to be retaken.
I will update everyone here later when these have been done.
Mick's Modelling Website
Wednesday 10 October 2012
SR-71A Black Bird Quick Build
When I was a teenager, I built a 1/72nd scale model of the SR-71 Black Bird. At the time, this was my pride and joy, which took pride of place on my shelf. But over the years, the Black Bird disappeared and was long forgotten until recently.
This was when I promised myself that I would buy another Black Bird kit to replace the long gone model I had many years ago. So whilst at the Brampton Show a couple of weeks ago, I saw several kits of the Black Bird. One was the Testors 1/48th scale kit, very tempting and large. The other was the re-released Academy kit in 1/72nd scale. I opted for the Academy kit and money changed hands, result a smile on my face!
Last week, I realised I could use this kit for this months club competition entry and it will be a quick model to build. So work has started and all of the main construction is done. I am now at the stage to start priming and painting the fuselage. So here is a quick photo of where the Black Bird is so far.

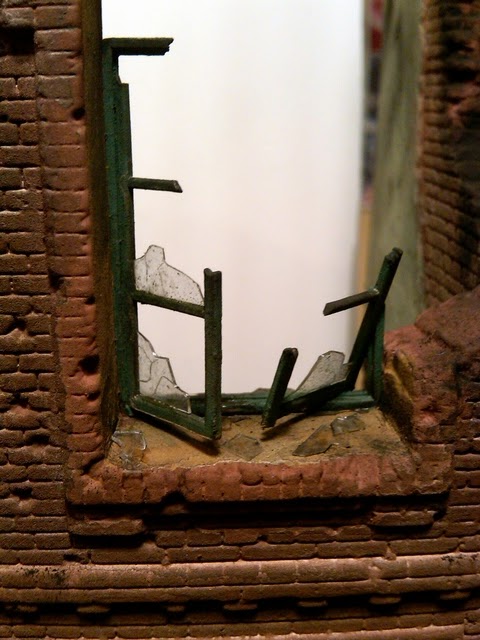
StuG III WIP #11
I don't know if you would call this therapy or torture, but I spent a few days making broken windows. Yes, I say broken windows.
Any building, no matter if it is residential or industrial, when it is damaged by an explosion of any means, the glass in the windows will get broken. So, I had to make the windows have some broken panes of glass in them.
I started this tedious task by cutting out the individual panes from a sheet of clear acetate plastic. Next, I scratched random cracks in each pane with the back of an glued them in old number 15A scalpel blade. With a new blade, the panes were cut into smaller sections in random shapes and sizes to represent the broken pieces of glass. The pieces with the straight edges, were then glued into position on the window frames, which at time made me utter a few naughty words when they fall out of the frames.
So, after a few evenings of fixing the broken glass in place and when it got to the stage that I was pleased with, the process of placing the scattered broken pieces of glass began. Making these pieces was a lot easier, I just took a small piece of the acetate used earlier and just cut out random bits in various sizes and shapes. Next I glued them below each window on the floors, pavements and window ledges. I still need to cut some more pieces and continue scattering them around the base, but you need to have a break from this before you go mad!
Further weathering has also been done the the building to. The main painting is completed and some grass has been laid to the side of the house. The lamp post has been painted and glazed, then finished with a little weathering. There was meant to be two sets of overhead cable gantries for the tramlines, but these were not in the box when I opened it. So I modified the remaining lamp post and bent it over to look damaged from the shelling. This way I do not have to try and make the cable supports and I have shaped some wire to look as if it is still hanging from the gantry.
So the base is basically done now, just some little detailing to finish off on it. Now to finish the StuG's weathering and detailing, then finish painting the figures and this project will be completed.


Subscribe to:
Posts (Atom)