It is amazing what you can pick up at a model show and for a reasonable price too. The previous owner of this kit probably had the same idea as me for this model, not to build it as a rally but as a road going stock/tuner example. They had already sanded away the moulded aerial bases and the bonnet safety catches from the bodyshell, and that was all they had done.
So five or six months back, I got this kit out and started to got through the options for changing the wheels on it. I toyed with a few different options from my collection of wheels, but none really stood out on the model. Plus they would have needed to be converted to the Tamiya fitments to go on the Scooby and also fit around the large front brake discs. So I decided to stay with the stock wheels in the kit.


After some thought about how I was going to build the model. Do I put the fog lights in the bumpers and the bonnet mounted fog lamps? The answer was no, this was not going to be a rally car so it did not need them. Next it was how was I going to change the general look of the car. I thought about building up the front bumper and spoiler, wings, rear bumper and the boot spoiler. Just like a big body kit that they add to these cars. But I decided not to go that mad and keep it more subtle.
On the front, all I did was to extend the lower lid of the spoiler using plasticard and plastic rod then later add a bit of filler to give it some more shape. Once I was happy with the basic shape of the spoiler lip, it was time to more onto the side skirts. My original plan was to do the same as the front spoiler, just extend them and add a little filler to shape them up.


After I had got the basics of the front spoiler and side skirts done, I moved to the back of the car. What was I going to do here? First, I wanted to put two large bore tailpipes on the car. So I did a little of modification to the kits exhaust, added an extension to add another tailpipe to the other side of the car. Te new tailpipes and the extension were made from plastic rod and tube. They still need a little bit of tweaking to get them right, but that will be done as I finalise the rear of the car. Next, i decided to add a rear diffuser underneath the rear of the car. The first one I built was a flat wide one, similar to what they fit on some racing cars, but I did not like how it turned out. Next it was a smaller one, but I got the angle and curve wrong on it. So I started to do a third one with a lesser curve to it, but packed the Scooby away for a while whilst I dealt with a couple of other models for Telford.


Anyhow, jump forward a few more months and I am off work on long term sickness after an accident at work. After finishing off a few other "On-hold" projects I have moved onto the Ferrari F40 (which will be updated separately) and the Scooby. I got the Scooby out of the box, had a good look at it then reviewed what the plan for it was. I was happy with the front spoiler, it just needed to have some filler added and sanded to shape. The side skirts now did not look right, so they had to be changed. I trimmed the extensions back to the original skirt edge, but left the plasticard underneath to add some more depth to it. Next, after sanding down any rough bits, I glued a strip of half-round plastic along the skirt edge to round it off. On the rally versions, there are location points for the car stands to slide into when the mechanics are working on it during a rally. I do not need these on the model so they have been filled in.


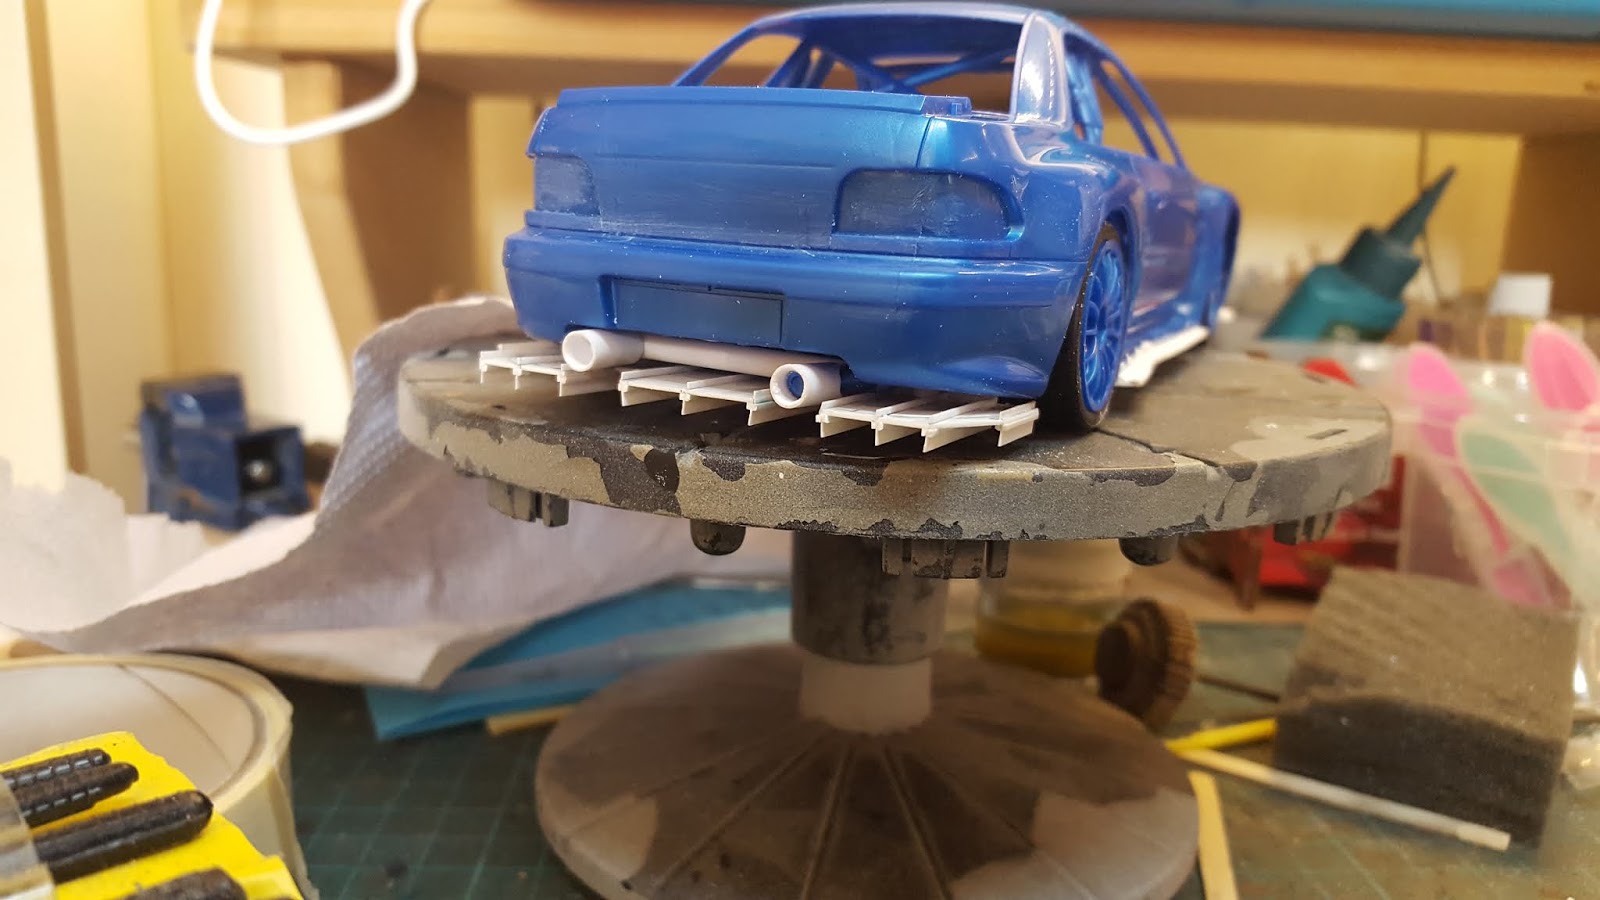
Then it was back to the rear of the Scooby.What was I going to do here? Well, to start with the diffuser idea has gone out of the window. But the rear bumper does still sit high off the ground, so I have to add to the lower edges of it and bring it closer to the ground. I started with a length of 2mm plastic rod, heated it up with a hair dryer and bent it to match the shape of the bumper. These parts were then glued in place along the edge of the bumper. I now added a length of 1mm plastic rod and glued them around the outside of the 2mm rod. To build up the rear ends, I added a short length of 1mm mainly to give the putty and filler something to hold onto. Mr White Putty was now added, left to harden overnight and sanded back. The shape and size was still not right, so a second layer has been added and sanded, bringing these areas closer to the shape I want. Next I will start with some filler to get to the final shape that I am looking for.
Once I am happy with the sides, I will move onto the centre section between the tailpipes and close this area off to match the sides of the bumper.


At the minute, you can see that I have assembled the roll-cage and dry fitted it into the interior. I do not think I will go with the cage, but leave it out. But this gives me another problem, there is no rear seats with the kit. So I am thinking about paneling the rear space out and add a few amps and speakers where the rear seats were. well, that is one idea for now. I might also have a look at some of my other aftermarket wheels to see if any of them will firstly fit over the front discs, and also look good on the car. I have also got Bolton Model Show this weekend, so I might even have a look around there to see what is on offer.