I don't know if you would call this therapy or torture, but I spent a few days making broken windows. Yes, I say broken windows.
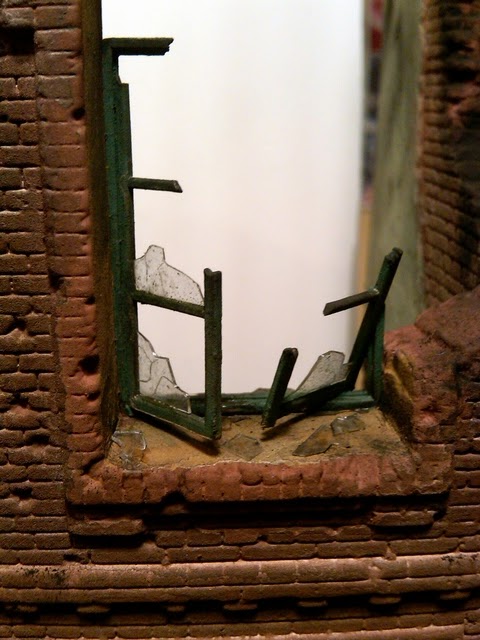
Any building, no matter if it is residential or industrial, when it is damaged by an explosion of any means, the glass in the windows will get broken. So, I had to make the windows have some broken panes of glass in them.
I started this tedious task by cutting out the individual panes from a sheet of clear acetate plastic. Next, I scratched random cracks in each pane with the back of an glued them in old number 15A scalpel blade. With a new blade, the panes were cut into smaller sections in random shapes and sizes to represent the broken pieces of glass. The pieces with the straight edges, were then glued into position on the window frames, which at time made me utter a few naughty words when they fall out of the frames.
So, after a few evenings of fixing the broken glass in place and when it got to the stage that I was pleased with, the process of placing the scattered broken pieces of glass began. Making these pieces was a lot easier, I just took a small piece of the acetate used earlier and just cut out random bits in various sizes and shapes. Next I glued them below each window on the floors, pavements and window ledges. I still need to cut some more pieces and continue scattering them around the base, but you need to have a break from this before you go mad!
Further weathering has also been done the the building to. The main painting is completed and some grass has been laid to the side of the house. The lamp post has been painted and glazed, then finished with a little weathering. There was meant to be two sets of overhead cable gantries for the tramlines, but these were not in the box when I opened it. So I modified the remaining lamp post and bent it over to look damaged from the shelling. This way I do not have to try and make the cable supports and I have shaped some wire to look as if it is still hanging from the gantry.
So the base is basically done now, just some little detailing to finish off on it. Now to finish the StuG's weathering and detailing, then finish painting the figures and this project will be completed.