Saturday 30 March 2013

"End Of An Era" XH131 WIP #4

There has been some more progress this week. My target is to finish XH131 this weekend so I can then continue with the figure, ground equipment and the base which needs painting.

The first two photos below were taken during the application of the decals. The kit sheet was used for this along with the numbers from the kit used for XH134. The white XH135 number had to be modified into XH131 but cutting the "5" from the end of one set of decals. Then I had to cut out the number "1" from the middle of the other set of decals and place that at the end to create the new number sets.


The next photo is the model once the undercarriage, bay doors and flaps were glued into position. On this model, I used some fishing shot in the unused front camera bay for extra weight instead of the single lump of white metal. This seemed to work better this time around.


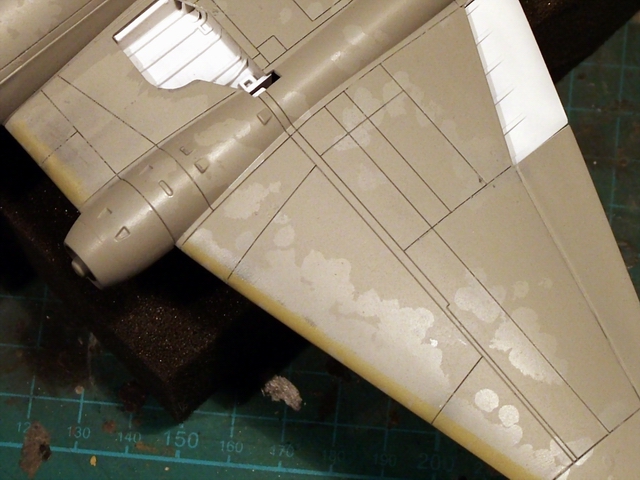
The next stage is to give the model a couple of coats of matt clear before the final weathering and assembly of the model. So a few more hours of work is needed before completion of XH131.

Just to get an idea of how the three aircraft will be displayed, here are some quick photos of how they will look on the base that is going to be used for them. The base still needs to be painted and detailed, and the vehicles are nearly finished to. I just have to make the two remaining ladders for the aircraft, paint a few more figure and add the POV covers on XH131 and XH135. 


Friday 29 March 2013

Merlin Fired Up!

Here is a short film of a Rolls Royce Merlin fired up on a display trailer at a car show.

Enjoy!


Friday 22 March 2013

"End Of An Era" XH131 WIP #3

The last two weeks things have been a little slow on the modelling side of things, some family matters have cropped up and had to take priority. Now these have quietened down, the model building can now start to catch up. I was hoping to have XH131 nearing completion for the East Midlands Model Show, but this has not happened as can be seen. But paint made its appearance on her over the last two weeks, slowly!

As this aircraft of the three was to be in the state as she returned from Afghanistan with the ARTF paint worn away in places on the wings and around the nose. First I sprayed some of the RAF Light Aircraft Grey on the underside and then some RAF Hemp on the top and underside leading edges. On the areas of these colours that will exposed by the worn ARTF paint, I masked them using some Micro Mask. The model finally received a couple of coats of RAF Barley Grey for the ARTF paint. 

Once this has dried overnight, it's time for the therapy session! This consists of taking short lengths of masking tape, then stick it over the areas with the Micro Mask on it. As you pull it off the model, the Micro Mask sticks to the tape and lifts away from the model, thus revealing the colours underneath. Then after you have done this, you feel relaxed and stress free!

So here are a few photos to show what this method looks like done. There is still some weathering to be done on this before it is finished.


Tuesday 12 March 2013

"End Of An Era" Vehicles WIP #2

Now to follow on from yesterdays post about the vehicles for the "End Of An Era" dio, I said about how diorama's develop as they progress. This has been the case for this one and with the addition of first the figures and then the Bedford MK and Land Rover. I started to think that the base would still be a little bare, so I knew there was the Revell NATO Ground Support Equipment set in my stockpile that I had started a while back, so the box was dug out and I needed to chose what to use.

The first item was the Still Hanger Tractor which was already started. As the diorama was going to show the aircraft getting ready to depart for one of the Airshows they did during the last weeks of service, it would be ideal to have this sitting there towing the various trailers around the airfield.


The second item is the 30KVA Starter APU seen on the apron at RAF airbases around the world. This is a simple details model which will add some atmosphere to the scene.


The third item is the Sun Electric Systems H2987 Hydraulic test stand which is another trailer seen on airbases around the world.


All of these models and the aircraft towbar have all been painted in the same green as the Bedford and Land Rover. Once the detail painting has been completed, I will make some RAF markings to go on the models as the ones supplied with the kit are for the German Air Force. Once work is finished on these, more photos will be taken and posted on here.

Monday 11 March 2013

"End Of An Era" Vehicles WIP #1

As with most of my projects which are dioramas, they tend to develop as the project progresses. My original plan was to just have the aircraft sitting on the base by themselves, then it was decided to add a few figures with them. Further time was spent looking at the models as they were built and more ideas came to mind, I needed some vehicles on the base to!

Last year at Telford, I purchased the Airfix Club UK Military Support Set which consists of a Bedford MK refueller and a Land Rover hard roof with 0.75 ton trailer. It was decided that I would use them with the Canberra's and they were dug out from the storage box for work to start on them.

First the Bedford was started and built into the four sections ready for painting. These were the chassis, cab, fuel tank and the housing for the pumps and controls. After priming, the cab interior was painted with matt black and the same green as the exterior will be painted. Then the clear plastic body was glued onto the interior before masking the windows prior to painting. So that there would not be any primer grey showing though inside, I painted the clear plastic with some Mr Metal Primer which is clear. The the rest of the model received a coat of grey primer before a few coat of Tamiya XF61 Dark Green. Detail painting followed then the decals for the version based at RAF Wittering were used on it.


The Land Rover and trailer now were assembled and I had to make a choice on what to do with the Land Rover. There was three option in the kit for it, RAF Police, RAF Mountain Rescue and Royal Navy schemes. The Navy one was a no go and I did not fancy any of the other two either. So a compromise of the two was done using the registration of the RAF Police and the yellow band from the Mountain Rescue markings resulting in a normal looking RAF Land Rover. To hook up the trailer to the Land Rover, there was a large moulded hook on the rear of the Land Rover which looked really bad. So this got cut off to clean up the look of the rear end. The trailer was also built and it would be sat in the corner of the base out of the way. This was going to be the end of the vehicles, but guess what, it was not. But this will be in the next blog tomorrow!


"End Of An Era" XH131 WIP #2

Even though the updates on XH131 have not that frequent, work has progressed on her along side XH134 being completed and the vehicles to be used on the display base for the three Canberra's. The details of the vehicles will be in the next blog after this one.

In these first two photos, the fuselage has been assembled and is awaiting the wings to be fitted. I did a better job dry brushing the cockpit dials this time then on XH134, not as if they will be seen that much. 


Assembly continued over the last couple of weeks whilst I took this model to work with me. Over the weekend, the final pieces of the fuselage assembly were added before the cockpit and observation windows were masked up ready for primer. This took place yesterday morning and highlighted a few joint lines that were still visible. These will be dealt with tomorrow night before a final touch up with primer. 


Once painting of the colour scheme starts, I will first paint a few areas with some RAF Hemp and RAF Light Grey for where the ARTF Grey has been worn away. Then after some masking the ARTF Grey will be sprayed and that finishing process will be that same as XH134. So fingers crossed that there will be some colour on her by the weekend!