Sunday 24 May 2015

Airfix Club Messerschmitt Bf 109E-3 Finished

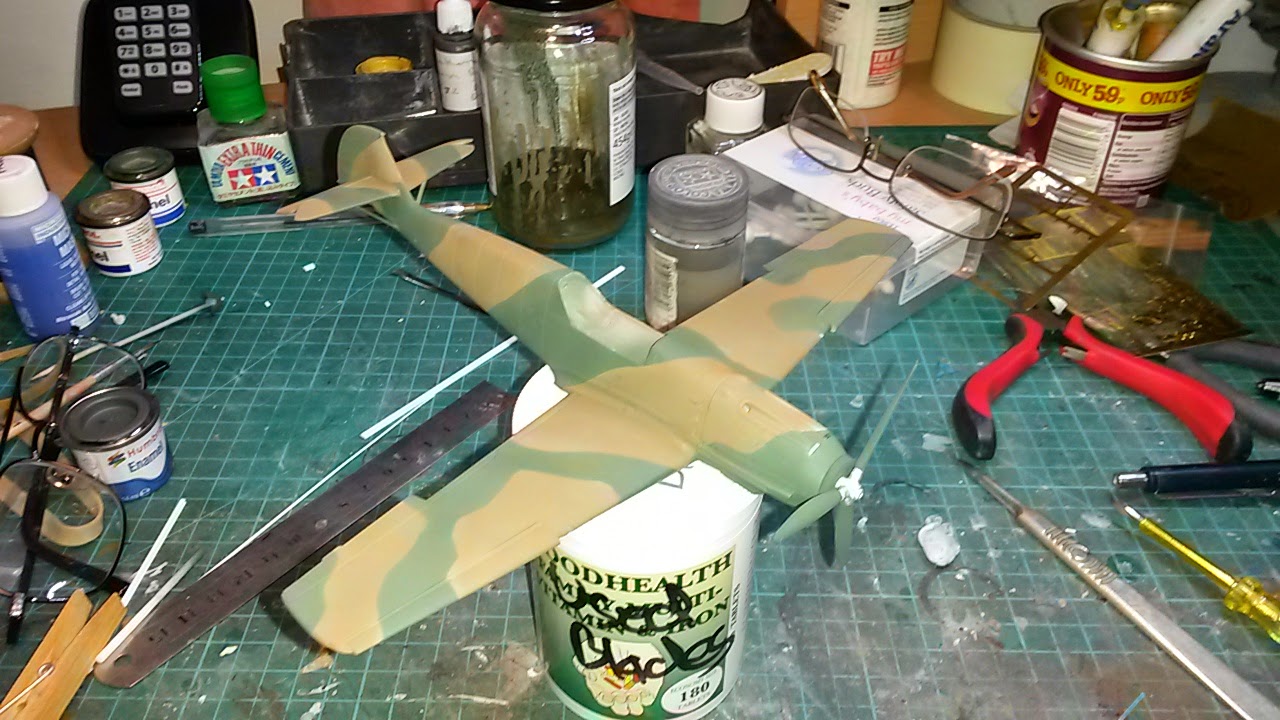
I wish I had done some more WIP posting of this build before this final one, but time has the issue as with most of my builds. By the time I get the call from "SWMBO" to go downstairs to spend some of the evening with her, I just don't get around to doing an update on here, then time goes by and you keep forgetting to do it. So here is what happened during the last couple of weeks with the 109.

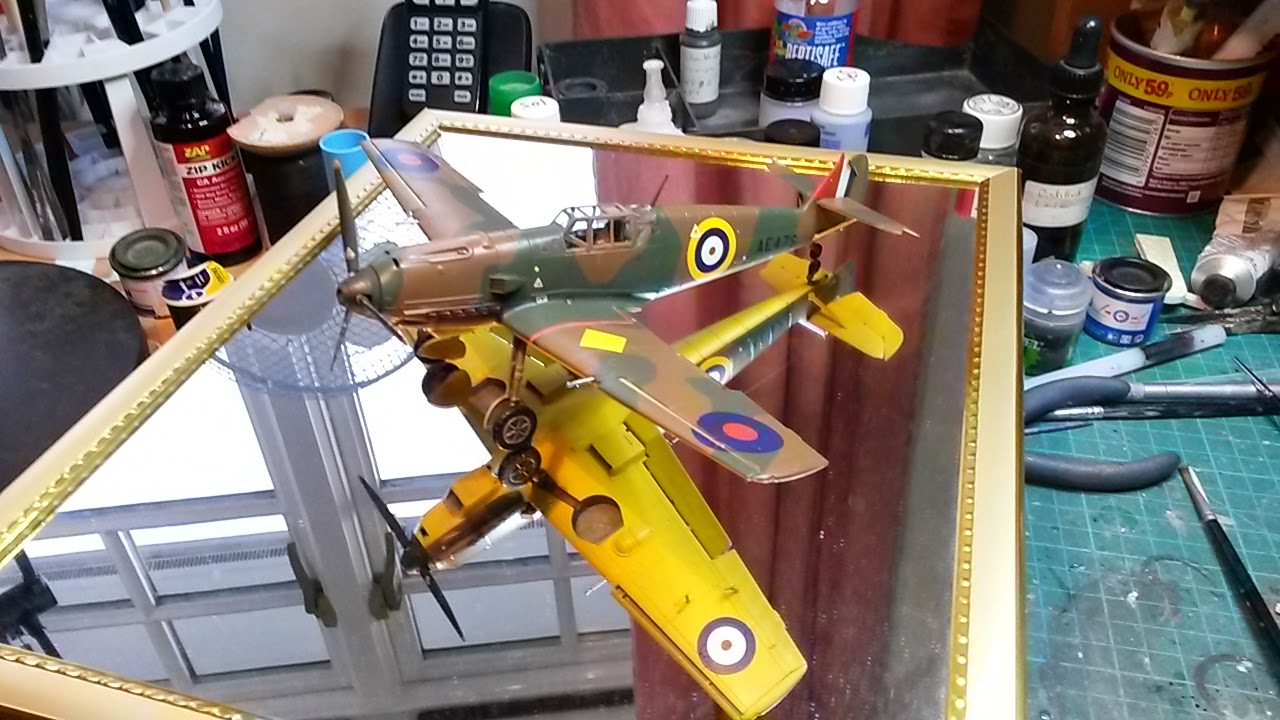
After a little rub down of the bad areas on the underside, I resprayed the yellow using the new tin of paint and this did not have any reaction this time when I used the clear on it. But to play safe, I used the Xtracrlix gloss clear over the whole model. Work could now start of applying the decals to the model.


Once the decals were done, a couple of coats of matt clear was blown over the model to seal the decals. Again, I used the Xtracrylix clear for this. Now the detail paint could be started on the undercarriage bays, doors, canopy sections and the engine bay area. On the weathering side of this model, I did not want to go overboard with it. I had already weathered up the cockpit interior before fixing it inside the fuselage, but on the rest of the model I only did the undercarriage bays, gear, doors, wheels and engine bay. My plan for this project is that it had just come out of the paintshop after being handed over to the RAF. For the general weathering, I used Citadel's Nuln Oil wash which I just brushed onto the areas required around the cockpit, undercarriage, engine bay, wheels and propeller. To finish off the propeller, I did some chipped damage on the leading edges using some aluminium paint and an old paintbrush.


Once all of the painting and weathering was done, final assembly was carried out and a length of invisible thread was used to make the aerial wire between the tail and cockpit. In general, the kit built up without any issues and problems that you sometimes get with aircraft kits. Airfix produced a great kit when they retooled the 109 and I will enjoy building the other retooled Airfix kits I have in my stash. But they will have to wait for a while until I finish off some of the other models I have in different stages of build. First the F-15C is priority on the bench and the Revell Ardo Ar-240C which I have just started.


Saturday 9 May 2015

F-15C Eagle WIP #1

Like a lot of you fellow modellers out there, I have several projects on-hold as to say. This is a right pain in the arse for me at times because they are just sitting there, in various boxes waiting for me to get them out, complete them and stick them on the shelf or cabinet. One thign I said to myself when we moved was to get as many of these on-hold projects finished as soon as I can. 

This Eagle is one of these projects which has been sitting there crying out to be finished, and after two plus years, I decided it was time to bring it out. This is an old Hasegawa 1/72nd scale kit of 1988 vintage. In general, the kit is okay and basically of the same quality as the F-15E Strike Eagle from Hasegawa  I build a few years back. Most of the construction work had been done, the fuselage and wings were all glued together with any gaps that needed filling. After getting the model out today, I added the tails and main  pylons to the wings and fuselage. I am just going to add the undercarriage bay doors to it next and then the model will be masked up ready for primer.

The model will be in the USAF grey scheme as that was the only option in the kit. But I am not sure what condition the kit decals are going to be in yet. But I do have a set of Two Bobs "Too Cool For School" decal sheet to use on the model instead. Now all I also need to do is find the container which has the exhaust and pilot seat in now!


Airfix Club Messerschmitt Bf 109E-3 WIP #1

I have mentioned this project during the Diamond T postings, but didn't get around to start the WIP posts of it here. This is just a quick (in my terms) build straight OOB, which will be a few months. This version is the aircraft which was captured after mistakenly landing in France and evaluated by the RAF at Boscombe Down.

Progress has been straight forward without any problems. Cockpit detail was basic, unlike some of the other new kits from Airfix in this scale. But overall, the general detail of the tooling and construction has been okay. The first two photos are when I started to paint the camouflage, doing the brown first in the rough pattern. Next the brown got masked off and the green colour was painted. This was done using the newer formula Humbrol enamels, which does not like to be thinned with any other manufacturers thinners I discovered.


The upper surfaces were next masked up and the underside with trainer yellow and once this had been left to dry, the model received a couple of coats of gloss clear ready for decal application. But this is where it has gone wrong. By my mistake, I decided to use an old tin of trainer yellow instead of the new one I had. This has reacted with the clear and bubbled up in a few patches on the main wing underside. I have now got to carefully sand this down and respray the patches with the newer tin of yellow. I was hoping to have the decals done of the 109 by Monday night, but this plan has been put back a little now.


Tuesday 5 May 2015

Mirror Models Diamond T 968A Cargo Truck Finished

Well, things progressed quicker then I thought it would over the last few weeks and a couple of things got changed from the plans. The first thing was scrapping my plan to add the canvas cover on the body. After making the frame up and a couple of attempts making my own cover, I discovered that I had got the frame completely wrong for the body. In the beginning, I could not find any images of the frame, so assumed that they were hooped frames. Then I finally found a photo of a body with the cover removed and saw that it was all wrong. So I decided to scrap the cover and frame completely from this project.


Next, I continued to assemble the model getting it to the stage for adding the decals. Getting the two windscreen halve to fit and stay in position whilst the glue dried caused a few expletives to come out of my hobby room. In the end, masking tape finally held the two panes in place to dry overnight.


This model only has a few decal to go on it. The areas were prepared by giving them a couple of coats of gloss clear before adding the decals, following with some matt clear to seal them afterwards. The cargo body was still separate from the chassis as it still needed the mud to be added underneath it. The doors and bonnet halves were also held in place by blutac until the weathering process was completed.


All of the photos of these Diamond T's had a hook with chain attached to the winch cable on the front of the chassis. Now, I had two lengths of chain come with the kit, but no hook. And does anyone manufacture hooks in this and other scales, I drew a blank finding any. So, a search on the internet for diagrams of the appropriate hooks I had seen in photos and after two attempts and a hour and half, one hook sat on the workbench ready to be attached to the chain and then the cable. In the end I was happy with the resulting item. 


The following photos show the mud added to the undersides of the cab, cargo body and chassis. This pre-mixed mud from MIG is good stuff and take the headache away from making your own mud mixture. I will be buying more of this stuff at the next show I visit.


Fitted to the T's were a carrier holding an axe, spade and pick axe, of which some were mounted on the fuel tank and other to the locker door on the other side of the chassis. The carrier is etched brass which needed folding into shape, but from the photos I have got from the internet, the axe head sat behind a plate and the spade blade went behind loop with the handle strapped to the plate for the axe head. These two items were made fro a piece of plasticard and brass wire before fixing the tools in place after painting and fitting the brass straps to them.


The cargo body was finally glued to the chassis and some more mud was added to various areas to finish the look off. In one of the later photos I discovered, it revealed the spare wheels were mounted on a bracket and then to the anchor point on the body. These were scratch built using plasticard and plastic rod, then painted before gluing them to the wheels and then to the anchor points. The wiper sweep areas were masked off using some tape cut to shape and size before going over the model with some washes followed by some dirt and mud colours airbrushed over her.


I finished of the truck using some MIG pigment powders before gluing the doors and bonnet halves in place on the cab. 

With the house move, this review build has taken a lot longer then I had originally planned. But once we were settled into the new house and I got my modelling mojo back, the Diamond T all came together to produce a lovelly looking model. Yes, she fought me along the beaten path, caused headaches and the occasional bad language. But I pressed  onwards and worked through the problems. Now to finish off the write up for the magazine. Hope you like the finished model?