When the Corsair's got to the stage that they could not be taken to work with me, I looked for something to do whilst sitting around at work. After sitting looking at my wardrobe full of kits for half a hour, I decided to start on this model. It is an old (and I mean old) Tamiya kit from properly the 1970/80's, it does not even have the paint numbers on the instructions. So I do not know what condition the decals are going to be in when I use them!
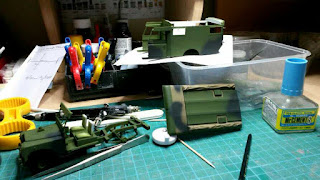
These first photos were taken in my cab at work where I did most of the main construction. Here the body and doors are just test fitted to the chassis to see how it all went together. Everything assembled up without any problems, which just goes to show how good a kit this was when it came out. I believe that Tamiya use the same chassis and front body section in the SAS Pink Panther Land Rover kit, which a friend of mine has just recently built. For now, I have left the rear door free so that they can be opened and closed, but I might change my mind about this later towards the end of the project.
This project was put on the sideline for the last month or so whilst I was finishing the Corsair's off and started on the Lightning. But I decided a few days ago to have a little break from the Lightning before painting her and get the Land Rover out and paint her first. After cleaning the model up, I gave it all a couple of coats of Alclad white primer. The interior of the ambulance was to be painted matt white, which I used Tamiya's matt white for this job, I also sprayed the roof interior with the same paint to.
Now, the instruction sheet only list the colours dark green for the base colour and cabin interior, and matt black for the Mickey Mouse camouflage pattern, no Tamiya paint codes! So I decided to use Tamiya's XF67 NATO Green and XF69 NATO Black on this model as I have seen some real Land Rovers of this vintage painted with NATO shade colours. So after the white interior was masked off, I started to spray everything with the NATO Green.
Once the whole model received the overall colour of green, it was time to add some Khaki to the roof section. First, I masked off the front section of the roof that was to remain green along the joint line on the roof, then hand painted the required areas with Tamiya XF49 Khaki. This was thinned with a couple of drops of water in a paint palette to allow a smoother, airbrushed look finish on the model. It was done with a couple of coats allowing time to dry between them. Once this was dry, I fitted the body back onto the chassis, masked off the windows to prevent over spray to the cabin interior. Now I airbrushed the Mickey Mouse pattern with the NATO Black all by freehand. This is how it was done in the real world and to no set pattern, but I did try to match it to the one on the instructions. Once I was happy with it, I dismantled the Land Rover, un-masked it and set about touching up any over spray on the roof. Now I have started to do the detail painting on the model, starting with the tyres and fit the wheels to the axles, mainly to prevent any damage to the underside of the chassis. The front seats have also been painted with khaki and fitted along with the various gear levers and handbrake.
Next, I am going to attempt to add the decals to the model. First to play it safe, I will give them a couple of coats of decal film paint just in case they are a bit brittle. So fingers crossed and I hope that they are in a better condition then I am expecting.


No comments:
Post a Comment