Hi All
I would like to wish you all a Merry Christmas and a Happy New Year.
Happy modelling in the new year and I hope you get the boxes of plastic that you want under the tree.
Mick
Monday, 24 December 2012
P-47M Thunderbolt "Wolfpack" WIP 05
There has been progress!
It may be slow at the minute, but other things in life have been getting in the way of modelling this month (work was the main cause). So, progress as of last night.
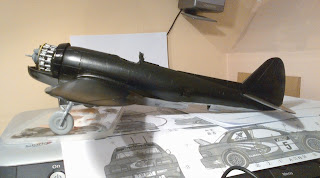
All of the wings are painted, with both Gloss Black on the upper surfaces and various Alclad's underneath. The nose sections and the rudder have had the required areas painted Red. Over the last couple of evenings, the undercarriage bays and doors, flap recesses on the wings and all the engine area have all been masked and sprayed with Interior Green.
Other various items like the tail undercarriage, main gear wheels, belly tank and wing pylons have also received their various colours of paint or Alclad. Now some more construction has been done which include assembling the tail undercarriage and fitting them to the fuselage along with the tail planes. I was hoping to have the main wings glued in place to, but a crack in the joint on one of them has left me the need to repair it and touch up the Alclad painted panel. This might get done tonight or over the next couple of days.
So, once the crack has been repaired, there will be a few more items that need to be painted with Alclad, so they will done at the same time as the wing. The cockpit canopy also needs to be started on to. There is two reasons for this, 1, it needs to be done with Alclad after the Interior Green and 2, I need to make a mask for the fuselage section behind the cockpit with it.
Anyhow, here are a few more recent photos to keep you updated.
Saturday, 15 December 2012
StuG III Diorama Finished
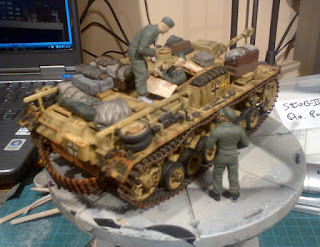
I took some photo's of the StuG III dio the other night for my website. As I still need to finish off the webpage for this, here are a few photo's that will be going up on the website in the next few as a taster.
I will post on here when the page is done.
I will post on here when the page is done.
Grumman F6F-3 Hellcat Added To My Website
My finished Eduard 1/48th scale Grumman F6F-3 Hellcat has been added to my website. It has been built in the markings of Lt. Alexander Vraciu when he was a member of VF-6 on the USS Intrepid in February 1944.
Grumman F6F-3 Hellcat Gallery Page
Grumman F6F-3 Hellcat Gallery Page
Tuesday, 11 December 2012
Website Update
My website has been updated today.
The gallery Page for my Lockheed SR-71A Black Bird has been added to the website and the Stocklist Page has been updated to.
Mick's Modelling Website
Lockheed SR-71A Black Bird Gallery Page
The gallery Page for my Lockheed SR-71A Black Bird has been added to the website and the Stocklist Page has been updated to.
Mick's Modelling Website
Lockheed SR-71A Black Bird Gallery Page
Finished Aircraft Models Page Updated
Some new photographs of my 1/72nd scale model of the Lockheed SR-71A Black Bird have been added to this page.
Completed Aircraft Models
Completed Aircraft Models
Friday, 7 December 2012
Eduard's Bunny Fighter Club
Yes, I had to get one.
This is just something completely different from the norm, as well as being a bit of fun. But there is a good reason to buy this kit. The benefits of the club membership!
The kit is Eduard's Profipack edition of the MiG-21MF, along with the Brassin interior and wheel sets.
So what else do you get I hear you ask?
Well, a great Bunny Fighter Club T-shirt, 15% off items from Eduard's store, special edition kits and detailing sets, loyalty price bonuses and free entry to the E-day Model Show. And this is for life to.
So, this will be started soon along with the two Airfix Camberra PR9's I brought to complete the trio of the 39 Sqdn aircraft in 2006.
P-47M Thunderbolt "Wolfpack" WIP #04
Now that my StuG III diorama is finished, it was time to finish off one of my many other ongoing projects. A few of them are ones that will take some time to finish them due to the nature of the builds. So I have decided to dig out the P-47 for working on at home as the main work to be done at the minute is painting.
So, over the last few nights, I have been spraying some Alclad on the underside of the fuselage before masking it off along with the wings to spray them with some Gloss Black. The actual aircraft was painted in Matt Black, but I used the Gloss just for laying the decals on it before finishing it off with some Matt Varnish. The tail and the engine covers still need to have some Red airbrushed on them before I start on the decals. There is also a few other items that need painting first before I fix the wings into place on the fuselage and start adding decals.
Hopefully there will be a good bit of progress on the Thunderbolt over the weekend so I can be ready for detailing things next week.
Sunday, 2 December 2012
StuG III WIP #12
This is a busy time of the year for me. I have the Nationals at Telford, several birthdays including my own and my wedding anniversary all within a few weeks. So modelling has suffered a little this month.
One good thing about going to Telford, was the chance to get hold of some clutter to go onto my StuG III model. I picked up some sets from Value Gear which are very good. Also I came across some nice little cheap sets from a company called KV Model. They do a variety of crates, bags, drums and other unusual items, like chopped logs with tree stumps.
So, back to the StuG's progress. Now that I have the various bags, crates and tarps, painting started on these items. I was quite pleased how they came out in the end after doing a black wash to tone them down. Sorry for the photo quality, they were quickly taken the other day on my phone.
I have now added some lumps of mud onto the hull of the StuG prior to giving it a go over with the airbrush. One of the ways I make my mud, is by mixing some scenic scatter in with some paint and apply the lumps whilst wet. These are left overnight to dry in place before weathering with the same colour through the airbrush.
Here I was playing around with the positioning of the bags and crates to where the figures will be standing. These are not the final placing for the clutter, but they have been glued in place since this photo was taken.
The next update on this project will be when it is finished. So far the figures are painted and more weathering has been done to the StuG. Now I just need to finish off a few bits and pieces on the tank and dio base, then it will be done.
Subscribe to:
Comments (Atom)


