Saturday, 26 September 2015

F-51D & P-51D Dual Build WIP #1

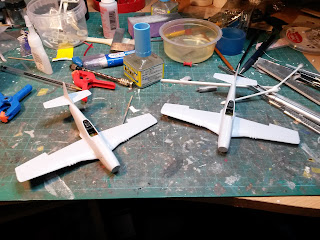
Well, I needed a little break from the F40, so I dug out these two great kits from Airfix. I also have one of the Red Tails Mustangs to, but that is packed away in a box up in the loft still along with an old P-51B from Airfix. The RAF Mustang is one of the starter sets, but the paints are not being used, I do not think they are any good. So, both are the same kit, except the F-51 has an extra sprue included containing a different propeller, missiles and bombs. 


Construction has been done on both models at the same time, this also continued onto painting the interiors on them. Airfix have produced a nice kit with these Mustangs, the detail inside and out is clean and crisp. My only gripe with them has been that the control sticks and masts are very fragile, easily snap when cleaning them up. I have had to make a new control stick for one of them from wire with a blob of superglue on the end. The masts, well, tried to clean one up and SNAP! So I am leaving them other one on the sprue to use it as a pattern to make two out of plaststrut. 


The interior was sprayed with Mr Hobby's H58 interior green then brush painted the detail. Once all of the detail painting was completed, I went over the interior with some of Vallejo's Game Color black wash to tone things down. To finish off the interior, I added the decal containing the dials.


Assembling the fuselages were a dream, no issues aligning them up and minimal effort to cleaning the joints. It was the same with the main wings, remembering to drill the holes for the pylons and for the missile carriers on the F-51. After the first one was finished, assembling the second was even quicker. Well done Airfix, you have done yourselves proud with this tooling!


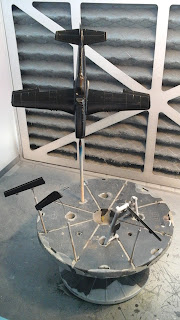
Onto painting now. As the F-51 is going to be in natural metal finish, I will be using Alclad for this job. First I sprayed the model with Alclad's gloss black base, then went over it with their honey primer. The P-51 will be painted using Xtracrylix paints, so I used the grey primer from Alclad on this model. I think these are some of the best model primers around to use.


The stage as it was last night. The F-51 had been painted. The whole model was sprayed with Alclad's airframe aluminium, before certain panels were picked out with duraluminium, dull aluminium and dark aluminium. To finish off, I sprayed the model with the gloss clear from Alclad to protect the finish. More progress on these two later.


Friday, 25 September 2015

Ferrari F40 "Blackstar" WIP #7

What a busy week it has been. The chassis and interior on the F40 are both completed now. Just spending that little bit extra on the seats putting the rounded off edges has made the difference on them in this scale. As you can see in the following photos, the seats had three extra holes drilled for the seat belts to go through as in a 5 point harness set up. But I have only installed 4 point harnesses on the model just as you find on the real F40's. 

For mounting the harnesses in the model, I have made some anchor loops out of wire and fitted them behind the seats on the bulkhead and the floor either sides of the seats. For securing the belts to these loops, I made a set of buckles to hook onto these from some plasticard. They are not perfect and if there were some etched ones available, I would have got them. But they are passable and not in clear view of anyone looking at the model. There seems to be more aftermarket items available for 1/12th and 1/20th scale cars then 1/16th, which is a shame due to the amount of models available in this scale.

Well, back to the F40. As you can see, the chassis is all completed and I am just waiting for the body to be finished off. I have started to clear it now, but it still needs a few more coats before I am happy with it. But I have decided to have a short break from it for a week. So I have dug out two of the great Airfix Mustangs in 1/72nd scale and build them side by side. I will post about these two tomorrow.


Saturday, 19 September 2015

Ferrari F40 "Blackstar" WIP #6

 One benefit of being off work, is that I get to spend more time in my workshop. Got another week and a half before I go back to work, so more time can be spent in here. Not allowed to do anything strenuous, model buildings the ideal recovery therapy. 

So, progress over the last few days. Firstly, all of the body parts have been primered and sprayed in black. These have been sitting to harden over the last few days before I give them all the clear coats either tomorrow or Monday. Next, I detailed up the bucket seats a little by adding the ridge where the seats padding and upholstery is secured to the seat body. This was done using some half round plastic rod and gradually glue it around the outside edge of the seat. This was finished off with a little filler and sanding. The F40 has 4 point harness belts fitted to them, but the seats are made for a 5 point harness system. So I had to drill out three extra holes in the seats to accommodate the harness belts.


Next, covering the seat backs with carbon fibre decal. My original plan was to try and do this with a single piece. So I made a template up then drew up and cut out a piece of decal. But when I went to lay it onto the seat, it would not behave and sit properly on the seat. So that idea was scrapped along with a large piece of decal. So a new reversible template was made of the side of the seat and four pieces were cut out and added to the seats. A final template was made for the back panel of the seats to complete the carbon fibre off on these. Once it was all dry, I trimmed off any excess and the openings for the seat belts to go through. I painted the seat to finish them off. The instructions for some reason, say to paint them matt white! I did not think this was right and all of the photos I have seen of the prototypes, the seat upholstery is all red. So the seats received a few coats of Revell's Carmine Red which I think looks a lot better then they would in white.


A quick dry fit of the seats and body to see how it all looks now that the interior is finished and the body is painted. The carbon fibre decal was well worth the time and effort of making the templates, cutting out each section and applying them all. Painting these areas on the model would have not looked right, especially in this scale. The seats I think are just perfect in red, white was definitely a no no. All that is left to do with the interior is assemble the two sets of racing harnesses and secure them in place, then the chassis and interior will be completed. The body is looking okay even without being cleared, but once that is done, we will be heading towards the finish line on the F40.


Now just to finish this post off, mounting the racing harnesses! The F40 has anchor loops to clip the harness belts to. Now, the harness sets that I had got for the model does not supply any parts for mounting them. So I have made some loops out of some wire and glued them into some drilled holes. I am also making the clips which hook onto these from plasticard. So below are two of the loops in place on the model and I will post about the clips and harnesses in my next installment.


Wednesday, 16 September 2015

Ferrari F40 "Blackstar" WIP #5

Welcome back for the next installment on the F40 build.

I thought I had initially finished the chassis last week, until I noticed that I had left a few pieces off on Monday. These were the two air filters and the rear screen, so these were quickly fitted and the chassis is finally finished along with the wheels fitted on as well. So here are a few photos of the finished chassis before all of the interior gets fitted in place.


Onto the interior now. On the instructions, everything is painted on the interior using two colours that need to be mixed up first. Now around 1996/7, I was lucky enough to go for a spin in a F40 and I can vaguely remember seeing bare carbon fibre panels on the interior of the car. Research on the internet confirmed this, but I managed to find some photos of the interior from one of the prototypes and noticed something slightly different. The production cars had the same size carbon fibre weave on the interior construction as on the seats. But the prototype had a larger weave on the body from the seats. So I had to source two different sizes of CF decal for this effect on the model. 

Carbon fibre decal sheets in 1/16th scale is hard to come by, but what I did was to buy some of Scale Motorsport's 1/12th scale for the body and 1/20th scale for the seat backs. Whilst i was waiting for the decal sheets to be delivered, I made up some templates for the main panels on the interior tub for covering out of masking tape. Five templates in total were made, one for the centre counsel and four templates for the side sections. Before adding the CF, I airbrushed the floor and rear panel with the required colours I had mixed.

First the counsel was covered and left to dry, then the lower front corner sections. Plenty of Micro Sol and the hairdrier were used to get the decals to stretch into place. The two front kick panels were next followed by the inner side panels finishing with the outer panels. The front inner panel was measured up and transferred onto the rear of the decal sheet, cut out and then applied to the front inner wall. The last bits to be done was the handbrake opening/tray of the counsel. I cut two strips to run around the sides then two more panels for the bottom. This completed the CF decals for the car interior tub and now just needs the paint to be touched up after it was stained by the Micro Sol.


The dashboard was painted almost to the instructions. Another difference I noticed was the panel in front of the passenger seat was in a gloss black finish, not the same colour as the dashboard. Luckily, I had left this off to make it easier to paint anyhow, so this was brush painted with gloss black before all of the panels/lights, or what they were got painted.All of the dial decals were added after painting and given a couple of coats of Johnsons Klear to seal them. Not I just need to paint the accelerator pedal, gearstick and handbrake lever before gluing them in position. The seats are not done yet because I am doing some modifications to them for the 5 point harnesses and adding some extra detail around their edges. I will update on these later.