I know what you are going to say "Another new project?". Yes, I am afraid it is. The trouble is all of my other ongoing projects at the minute are at stages where I cannot take them to work with me because of various reasons like painting, delicate assembly or their size. So something else was need to fill the time I spend sitting on loading bays, etc.
Work started a couple of weeks ago now, but progress has been slow so far. This kit has a fair bit of interior detail that can be completed before any painting need to be done. I have also got a set of Fruilmodel Sherman Firefly individual link track for this project, so these will take a good amount of time to build them up. But before these get started on, the rolling chassis needs to be dry assembled to get the positioning for the links that are angled where they sit drive sprockets and idler wheels. So plenty of work to be done on this project to keep me busy for now.
I will post some photos of this project in the next few days.

My Blog for updating progress on current "Work In Progress" modelling projects, general news and chat.
Tuesday, 10 July 2012


49 Mercury Custom WIP #5
The push to finish the Mercury is now on. My fellow club member Richard, has got his Ford Pick-up finished and he has done a very good job on it. So I cannot allow myself to be left behind in this Build-off I started within the club.
Over the weekend, the bodyshell and bonnet received a few more coats of clear. I am now leaving them for the week to harden before I get the micromesh out and polish the clear. But it already looks better now even with a little orange peel on the surface.
The following photos were taken tonight just after I finished the chassis off. My original plan over the weekend was to scratch-build a new exhaust system for the Mercury, of which I started with the rear box section that was to have four tailpipes coming out of it. Unfortunately, this would not fit together as I hoped, so I decided to go with the sidepipes that came with the kit. A little modification was done by drilling out the exhaust exits and painting the plates. As there was no downpipes supplied, I made two from some plastic rod by bending them to get the shapes required. This took a few attempts on each side, but I ended up with the right shape I wanted for them in the end.
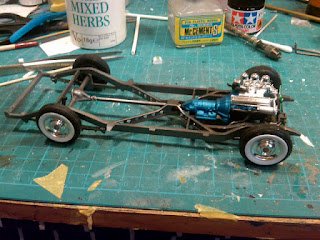

The kit came with two sets of wheels, one set of chromed steels and these ones with white wall tyres. These looked the best for this model so the other wheels can be used on another model at a later date. I hope you agree with me on this choice? Once the wheels were fitted to the chassis, I noticed a slight twist in it, so hopefully once the chassis is glued to the under body it will sit flat and straight.

Now onto the lower body section. The interior is completed except for the steering wheel and column, these still need painting before fitting into position to the dash and floor. There is a little bit of detail painting to be done in the engine bay to finish that off. This is the battery terminals, steering column exit plate on the bulkhead and other small details. I might even add a couple of data plates to the bulkhead to finish it off. Once these little jobs are done, next step will be to glue the chassis to the underneath, add the radiator and front panel. Then to finish this off, the water hoses and side pipes will be glued into position then all of this stage of the build will be finished.


The next stage of this project will be to polish the body, add some chrome trim around the windows, fit the light, wipers, etc. So, I hope to have the Mercury finished in the next couple of weeks with luck.
Over the weekend, the bodyshell and bonnet received a few more coats of clear. I am now leaving them for the week to harden before I get the micromesh out and polish the clear. But it already looks better now even with a little orange peel on the surface.
The following photos were taken tonight just after I finished the chassis off. My original plan over the weekend was to scratch-build a new exhaust system for the Mercury, of which I started with the rear box section that was to have four tailpipes coming out of it. Unfortunately, this would not fit together as I hoped, so I decided to go with the sidepipes that came with the kit. A little modification was done by drilling out the exhaust exits and painting the plates. As there was no downpipes supplied, I made two from some plastic rod by bending them to get the shapes required. This took a few attempts on each side, but I ended up with the right shape I wanted for them in the end.


The kit came with two sets of wheels, one set of chromed steels and these ones with white wall tyres. These looked the best for this model so the other wheels can be used on another model at a later date. I hope you agree with me on this choice? Once the wheels were fitted to the chassis, I noticed a slight twist in it, so hopefully once the chassis is glued to the under body it will sit flat and straight.

Now onto the lower body section. The interior is completed except for the steering wheel and column, these still need painting before fitting into position to the dash and floor. There is a little bit of detail painting to be done in the engine bay to finish that off. This is the battery terminals, steering column exit plate on the bulkhead and other small details. I might even add a couple of data plates to the bulkhead to finish it off. Once these little jobs are done, next step will be to glue the chassis to the underneath, add the radiator and front panel. Then to finish this off, the water hoses and side pipes will be glued into position then all of this stage of the build will be finished.


The next stage of this project will be to polish the body, add some chrome trim around the windows, fit the light, wipers, etc. So, I hope to have the Mercury finished in the next couple of weeks with luck.
Wednesday, 4 July 2012
49 Mercury Custom WIP #4
I have decided to have a little break from working on my aircraft projects for a few days and catch up on the Mercury build. Up until the weekend, I had got the body shell and under body painted with the Palladium Silver as planned. To add a little extra to the colour, I gave the body shell a light dusting of Alclads Prismatic Jade before the clear coats. This gives it a slight effect of the Gold changing to Green as the lighting changes, but not an overpowering effect of this. So far, there has only been a few coats of clear gone down on the body shell and it needs a few more coats. This will be done when the weather allows to spray it outside.


I finally came to a decision on the interior colours over the weekend. I went with Tamiya's XF23 Light Blue for the carpet, roof lining and all pleated panels on the seats and doors, with Tamiya's XF18 Medium Blue for the rest of the upholstery and dashboard. Areas that would be leather were given a coat of semi-gloss clear. I then picked out the chrome surrounds of the dials and just need to add the decals for them now and the dashboard can be added to the interior.

The chassis and engine are not far off from completion. The engine is now finished and glue into place, but the exhausts still need to be modified slightly then glued into place. Also, the wheels, brake panels and rear shocks need to be fitted and this will get the chassis done and ready for fitting to the lower body section.


I hope to have some more photos done this weekend after some more work has been done over the next few days.
Saturday, 30 June 2012
P-47M Thunderbolt "Wolfpack" WIP #03
Time is a funny thing! You need time to work, time for family stuff, time for doing things around the house, time to sleep and time for yourself. But there is just one little problem, there is not enough time in the day for all of these things!
Due to this lack of time, mainly cause by work taking up too many hours during the day, my modelling has suffered a little over the last couple of months and general progress on projects has been slow. My P-47 Thunderbolt has taken a few more steps forwards now. The main construction work has been done, the fuselage is assembled along with the wings and I have even started to paint the bird. The colour scheme I have gone for is the Matt Black upper surfaces with bare metal below. So out with the Alclad and the use of various shades of Aluminium. My original plane was to start with Airframe Aluminium all over and pick out the odd panel with other shades. But I changed my mind and went for Duraluminium as the general colour, then pick out the panels with other shades.

I am painting this model in separate sections, i.e. wings, fuselage, cowlings, etc, to get the Alclad right. You can see in the above photo that the left hand wing upper surface is already in Matt Black. I found that it was easier to mask up the wing for painting the separate panels and upper surface not attached to the fuselage. I will be doing the same with the other wing and tailplanes as I go along. The engine covers and cowling are being painted in Alclad first and when the fuselage has had the same treatment, I will be dry assembled for masking prior to the Matt Black.

Here you can see the lower engine cover and the cowls already painted with Alclad. All of the cowl panels and engine covers are painted with Alclad to allow worn areas of paint to show the metal finish below. Most of the painting on the engine has been done, only a bit more weathering needs to be done to in now to finish it off.

The underneath of the wing shows the difference in the Aluminium shades that have been used. The undercarriage bay will need to be repainted and weathered before final assembly of the model. Panel lines will also be picked out and staining from the guns once the decals are added.
Due to this lack of time, mainly cause by work taking up too many hours during the day, my modelling has suffered a little over the last couple of months and general progress on projects has been slow. My P-47 Thunderbolt has taken a few more steps forwards now. The main construction work has been done, the fuselage is assembled along with the wings and I have even started to paint the bird. The colour scheme I have gone for is the Matt Black upper surfaces with bare metal below. So out with the Alclad and the use of various shades of Aluminium. My original plane was to start with Airframe Aluminium all over and pick out the odd panel with other shades. But I changed my mind and went for Duraluminium as the general colour, then pick out the panels with other shades.
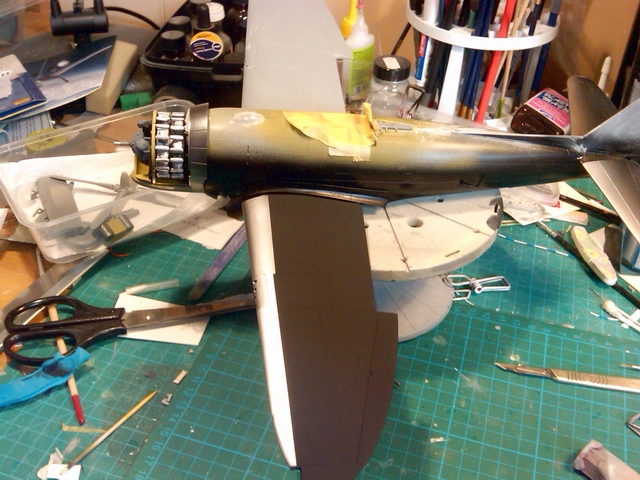
I am painting this model in separate sections, i.e. wings, fuselage, cowlings, etc, to get the Alclad right. You can see in the above photo that the left hand wing upper surface is already in Matt Black. I found that it was easier to mask up the wing for painting the separate panels and upper surface not attached to the fuselage. I will be doing the same with the other wing and tailplanes as I go along. The engine covers and cowling are being painted in Alclad first and when the fuselage has had the same treatment, I will be dry assembled for masking prior to the Matt Black.

Here you can see the lower engine cover and the cowls already painted with Alclad. All of the cowl panels and engine covers are painted with Alclad to allow worn areas of paint to show the metal finish below. Most of the painting on the engine has been done, only a bit more weathering needs to be done to in now to finish it off.

The underneath of the wing shows the difference in the Aluminium shades that have been used. The undercarriage bay will need to be repainted and weathered before final assembly of the model. Panel lines will also be picked out and staining from the guns once the decals are added.
Tuesday, 26 June 2012
Airbrush & Model Cleaning Brushes

Here is a little tip for all you modellers out there.
I found these little brushes in a chemist down town that are used for cleaning between your teeth. They come in a range of various sizes and in the case of this manufacturer, a plastic cap that doubles as a handle for when you use the brush. So I got thinking could I use these and brought myself a pack of 0.4mm brushes, the pink handled brushes on the right to try out.
My first idea was to used them for cleaning my airbrushes. I already have some brushes specifically for this purpose, but there at times where these are either too big or small depending on which airbrush I am cleaning. Now these brushes are not as stiff as the proper brushes I have. The shaft is more flexible and the bristles are much softer, but they are shorter too. So these are ideal for if you are just doing a quick clean of your airbrush without a full strip down. Only take out the needle and remove the tip then use a brush of the required size to give the inside a quick clean out.
The second idea I came up with is for cleaning me models. You know how you get dust trapped in places that you cannot get to with a cloth or paintbrush without the risk of damaging the model! These brushes are the perfect thing for cleaning these delicate areas of dust and dirt. With the bristles being so soft, in various lengths and the flexible shafts which will bend to a curve to ease cleaning, makes them ideal for cleaning your models without damaging them. That is unless you are rough handling the model whilst cleaning them.
I picked these brushes up in my local Bodycare shop and they only cost about £3.50 from what I can remember. You might find them cheaper or more expensive in other shops, but this might also depend on the brand too. But do not get them from your dentist, they will cost you a fair bit more.
Subscribe to:
Posts (Atom)