Saturday, 20 August 2016

EE Lightning F1 Finished

The Lightning is finished and I am happy, well, very pleased with the final result. There was a few little hiccups along the way with her, of which a couple of the corrections have effected the end look. But this was only built for fun and not for entering into competitions.

The model has had some light weathering done to her including a dirt wash using Promodeller/Flory Models dark dirt wash. Once the final assembly was done, I finished off with a dusting of my grime mix through the airbrush along the leading edges, etc.

Would I build another Lightning in this scale? I don't know yet. The main problem is the size of her in 1/48th, which is also making me think about the four Canberra's I also have in this scale. If I did do another, then I might try one of the trainers that Sword Models do. I already have both the T.4 and T.5 from them in 1/72nd scale, so one of their 1/48th scale Lightnings might have to slip its way in.


Thought I  would also show how the resin ejector seat looked like before I fitted it in place. It was given an initial coat of Tamiya semi-gloss black first, then finished off using Vallejo paints. The decals which went on the kit seat were used on the resin seat to finish it off.


Any comment or questions about this model will be welcomed.

Tuesday, 16 August 2016

McLaren F1 WIP #1

I needed something to do during my down time at work again, so I dug out this Aoshima McLaren F1 kit. It was not a fresh start, I had already begun drilling out the holes in the disc brakes (a laborious task!) using a pin vise. So this process was finished off before proceeding with the rest of the model. 

The chassis had the suspension assembled and fixed to it and checked for alignment. The bodyshell now had any mould lines removed and blemished dealt with. Aoshima had managed to keep most of the mould lines along the edges and only a few crossing the exposed areas of panels. 

The doors were also cleaned up and the model was test assembled to see it there was any issues to be dealt with. The first thing that I did not really like was the tyres on the model. The rear ones especially look a bit too large profile compared to the real car, so I will be changing this with some resin aftermarket wheels. I also noticed a couple of sink marks on the door upper surfaces, these will need filling. This kit has the option of having the doors open or closed, so I need to decide if I have one, both or none open on the model.


Now jump a week or so, the bodyshell has been sorted out and doors had the sink marks filled and sanded. A decision on the doors was also made and I opted to open just the right hand door and fitted the mounting points to enable this to happen. The final bits and pieces were sorted out to bring the model up to the stage of painting. So at this point, I will have to put the project on pause until the Lightning is done and another little project is finished for an upcoming show. Now, what colour do I paint this? This is the next decision to make on the McLaren!


EE Lightning F1 WIP #2

I did not realise that it had been this long since I last updated on the Lightning project. But as you can see from the following photos, work has progressed a fair bit since the GT-R was finished. As I was doing the Lightning in one of the metal finish options, Alclad is going to be the main product used to paint her. 

The process started by using their grey micro primer followed by a few coats of gloss black primer. To help with the finish, a couple of coats of honey primer over the black improved the gloss finish of the black. 


First I sprayed the inlet ring, exhaust and two panels on the fuselage with Alclad chrome, then sealed with some Alclad aqua gloss clear to protect the finish. Then the exhaust outlets were hand painted afterwards.


After the chrome panels situated on the fuselage just under the wings were sprayed and masked off, the rest of the fuselage was sprayed with Alclad Airframe Aluminium and seal with some clear. I next picked out a few panels in different shade of aluminium like you will find on the real aircraft then sealed again with some more clear.


After the fuselage had dried overnight, it was masked off to spray the spine and tail with gloss black. I first went over the area with some black primer then the topcoat was done with Mr Hobby gloss black followed by some clear. 


I am still trying to find a masking tape which does not mark the Alclad when it is used on it. The tape that I use is meant to be low tack, but it still marks the finish of the Alclad. This needed to be touched up afterwards.


The Lightning is looking really nice at this stage giving me a boost for finishing the model.


Now it is time to start on the decals on the model. I started with laying down the roundals and general aircraft markings first on the model. Then the process of all of the aircraft stencilling decals started, which some lay over some of the roundals and marking.


Once all of the decals were done and sealed, I temporary stick the undercarriage on with blutac to see how she was sitting. No evidence of her trying to be a tailsitter, I had got the nose weigh just right on her.


The kit supplied ejector seat was not very good. In fact, the general detail of the cockpit interior and undercarriage bays are not up to the new kits from Airfix. For this project, I ordered a resin seat from Quickboost. Even though it was a seat for a Lightning, I needed to cut away small sections from the bottom edges to get it to fit into the space in the tub. This has made a vast improvement to the cockpit as it is the seat that you will mainly see looking in. 


These photos are about a week or so old now as we have had a little emergency at home. This post was meant to be finished and uploaded last week but I was unable to finish this post and another project post. The next post of the Lightning project will be of the finished model.

Wednesday, 3 August 2016

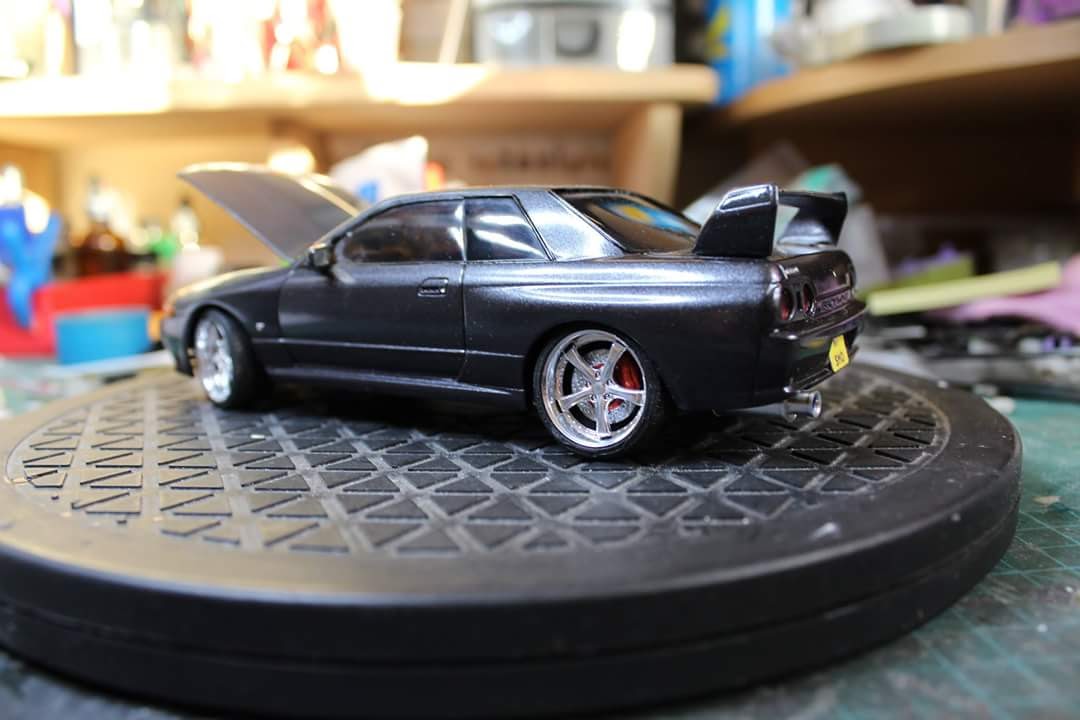
Nissan R32 GT-R All Finished

Sorry for the delay in updating the blog for the last month, but it has been a little busy at home and any spare time was spent at the workbench. But the GT-R has finally been finished, after a seven year wait. 

Even after all of this time sitting in the cabinet part finished, I am pleased with the finished model.  The few little changes that I did from the original plan, have improved my original vision of the project. The decision to have the bonnet open was the best way to go.  Adding the carbon fibre decals also gave a different look to. 

Anyhow, the GT-R is now finished, I am happy with the final outcome and it is back in the display cabinet.