Sunday, 24 February 2013

This is why I love Canberra's!

This is one of the reasons I love Canberra's. 

Here is a couple of short videos of some Canberra's. I hope you enjoy them.

Canberra PR9 start up, taxi and take-off.


Canberra WX163 at Kemble 1998


Canberra PR9 take-off and fast run


"End Of An Era" XH134 WIP #6

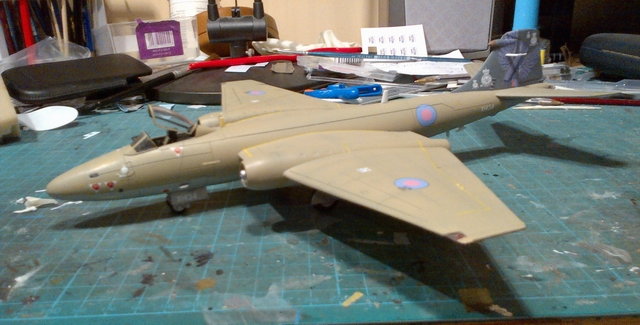
Well, this will be the final WIP post for XH134 as the build process has just completed today. I made a push this week whilst I had the week off work and succeeded today. All that is required for this aircraft now is the access ladders to be made up then painted and the pilot climbing them.

Yesterday evening, I added some extra weight in the forward camera bay. This has helped a bit but then once the ladder and pilot figure are added to the fuselage, a little more weight will be at the front of the model. I am going to have to rethink this on XH131 when work continues on her, will have to find a way to get more weight in that forward camera bay.

 Back to XH134. Since the last posting, the model received a couple of coats of matt clear before the final assembly and detail painting was finished. The final jobs that were done on the model was adding the aerial wire from the tail to the cockpit. I had pre-drilled a hole in the top of the tail ready to accept the nylon thread that I am using for the aerial. A drop of superglue was put inside the hole then the thread was poked in there and left to dry. Some more glue was put around the opening to ensure the thread did not pull out.

Once dry, the other end of the thread was glue to the pylon next to the cockpit. This took a few attempts as it kept slipping off the pylon before the glue set. The last thing to do was glue the canopy in the open position ready. Job done, XH134 completed and ready for take off!


Now that XH134 has been finished, I decided to line up XH134 and XH135 on my workbench (after I cleared it up a bit), then placed XH131 at the far end to get a better impression on how they will all look once XH131 is finished. The base I have ordered will be collected on Wednesday evening and will need to be painted. A few more figures will be added to the scene along with a couple of vehicles. I just cannot wait to see the completed scene.


Saturday, 23 February 2013

"End Of An Era" XH134 WIP #5

Progression on XH134 has been better then I thought it was going to be last Monday. Even with popping out to the shops again on Tuesday for some more shopping. Then on Wednesday we first travelling down to Hemel Hempstead to go swimming, only to find an extremely long queue to get in, so we decided to go to the pool in Bedford instead. And Thursday afternoon was spent with our daughter and the other three grandchildren around. But, I still got a lot of the Canberra done!

 My first job was to mask up the undercarriage bays and flap recesses before painting them white along with the undercarriage gear and the inside surfaces of the bay doors and flaps. These first received a coat of white Vallejo primer and once left to dry for a couple of hours, a couple of coats of Tamiya matt white wa blown over.
After the model was de-masked left to dry overnight, I thinned some Tamiya matt yellow and using a bow pen, I started to draw out the walkway guides on both of the main wings. Ideally, I would like to find an ink which is the right shade of yellow so I could use my drawing pens for this job. Or  I should even try to find some decals of various size lines in different colours. But as usual, I keep forgetting to do this. I finished off this stage by giving the model a couple of coats of Xtracrylix gloss clear ready for the decals to go down.

 These are the decals being used for this model. The main ones is the sheet that came with the kit of which I will be using the common stencils and the 2006 style stencils for the kits XH135 option. The other is the Model Alliance "Retirement Scheme" decal set which consists of the tail-art, all of the associated badges, aircraft number and roundels.


Now, this is where I made a silly mistake, again! I did exactly the same thing when I built XH135, I forgot to use the roundels from the aftermarket decal sheet. I was busy thinking about something else whilst applying the decals to the model. I tried to remove one of the roundels from under the wing, but it would not lift away and I did not want to risk damaging the paintwork on the model. SO they have had to stay, again! Once all of the decals were done, I gave the model another coat of the gloss clear to seal the decals. This was when I also noticed that the Airfix kit decals did not sit properly on the model. The same thing happened on my first Canberra where it looks like the decals has lifted slightly. But you do not see any sight of this until you spray some clear onto it. It does not say who supplies the decals for this kit, but it has happened on both of my 1/72nd scale PR9's and I bet it happens on the third one to.

Now, lets bring it all up to last night. Before I airbrushed any matt clear, I wanted to get all of the undercarriage gear, bay doors and flaps fitted onto the model. So first I painted the various aerials, camera bays, tyres and other little details on the fuselage. Next I assembled the front undercarriage then glued that in place with the bay doors. Once these were dry, I progresses onto the main gear gluing the first in place before doing the next one. As these were drying, the remaining  doors for the main undercarriage were glued in place then left to dry. Now, with adding a little over the recommended nose weight, you would think this will sit just right. But no, it is still a little tail heavy! So I dropped the pilots seat into the cockpit and placed the canopies over the opening, and this helped a little, but it lift the nose at the slightest touch. So the plan is to add a little more weight in the front camera bay, these were not used on these three Canberra's at this period, so they are panelled over.

All that is left to do on this model is as follows. Add the flaps to the wings, give the model a couple of coats of matt clear, paint the engine inlets and exhaust, add the extra weight in the front camera bay, add the pilots seat the canopies and add the aerial between the tail and cockpit.


Last night I finished off by placing both XH135 and XH134 on top of my tool cabinet to take a photo of them side by side. Once XH131 is finished, they will look very good all lined up on their base. When on display, these models will have a few more figures standing around plus a tug, AP unit and a Bedford MK refueller. The plan is for it to look like they are getting ready to head off to one of their last displays during July 2006 before being decommissioned from RAF service.

Thursday, 21 February 2013

What's This Here!

I was having a sort out of some boxes a few weeks back and I found this.


I built this Pontiac Firebird about thirty years ago when I was a teenager. The kit was a Revell 1/16th scale 1979 Pontiac Firebird 6.6 litre produced in 1980. Believe it or not, it was a snap together kit to, but I glued it though.

I think it is great to look back at the old models you've build, especially when you were young to remember where you started. This was brush painted with enamel paints, I did know about airbrushing then. The gold pinstripes were hand painted with a brush and that was basically it.

It needs a good clean up, the interior is covered with dust and the only damage is the driver side mirror being missing. Otherwise everything is there. Now I just need to work out how to dismantle this to clean the inside!

Finding this Firebird took me back and I can remember building this on the dining table covered with newspaper at my parents house. I am glad this never got binned like a lot of my other models I built before this one. I even found some old armour models that were built in my early teens a few months earlier and all of them are still available to buy now. 

You just cannot beat nostalgia and great memories! 

Tuesday, 19 February 2013

ModelKraft 2013 : Sunday 21st April


Coming up in the next two months is Milton Keynes Scale Model Club's show, ModelKraft. After last years show was hit by snow, the club decided to move the show to a new date later in the year, from February to April.

The show consists of two large halls with traders, clubs and SIG's, with a further upper floor level with more clubs and SIG's stands. Visiting the show again this year, will be members from IPMS Brno and hopefully doing some demonstrations again on their modelling techniques. Just outside of the main hall, is the Competition Room where all who visit can enter their model into various classes, including Junior sections for the under 16's. Also at the show there will be full catering facilities and disabled access between the halls and floors.

So put the date of Sunday 21st April into your diaries and spend the day at one of the largest model shows in England. Easy access from the motorway M1 at junction 14, just 5 minutes drive away and the same from the A5 trunk road. Free parking for those who drive at the centre and the route to the site signposted from the M1 and A5.