I just don't know how some people can just keep moving house every five or so years, it is just so disruptive and stressful.
Well, we have finally got our moving date, 24th of November. It taken a while for the solicitors to be happy with the searches, etc, then trying to get the other parties involved to agree on a moving date. It is hard to think, we have been in this house for nearly twenty one years, almost to the day as we moved in here on the 3rd of December 1993. The biggest thing is that I am moving away from my birth town, I have never lived outside of Luton in my entire life. So it is a big leap for me, but it is for the best because Luton is no longer a nice place to live. When I think back to my childhood and what it was like here back then, to how it has now changed for the worst. At least, the town where we are moving to is more like what Luton use to be like, and a lot smaller with only just over 13,000 people living there.
Now, onto the modelling side of my life. I have made some slow progress on the Diamond T, with some swearing coming out of the workshop because of it. I just wished that these people that design the kit and create the instruction sheets would try to build the bloody kit themselves using the said sheets! Maybe they might realise that sometime the sheets don't match up with what's in the box. But I will explain more about this in the next WIP posting of the Diamond T.
So over the next couple of months, there will not be much model building done because of the house move. Anyhow, about 98% of my modelling tools and equipment have been boxed up ready for the move in three weeks time. It is only when you are moving home and you start packing things up for it, that you realise how much stuff you have accumulated over the years in that house. In just my collection of unbuilt kits, I have got 19 boxes, 7 folding crates and 5 large kits strapped together. Let alone all of the built models and the various ongoing projects. That was bad enough, but then you forget about all of your paints, glues, tools, equipment, materials, display shelves, books, spray booth and workbench. That is when it starts getting scary, especially when you know the wife will see all of these boxes going into my planned modelling room in the new house.
Well, that's a little update of what is happening in my world at this present moment in time. It is stressful, we're both tired from it all, but we have not got everything all set to move now and all three of us cannot wait until we move to the new house. Especially now that my modelling room will be in a proper room and not the converted loft!

My Blog for updating progress on current "Work In Progress" modelling projects, general news and chat.
Sunday, 2 November 2014


Monday, 20 October 2014
Mirror Models Diamond T 968A Cargo Truck WIP #3
After several months of lack of enthusiasm, I seem to have got my mojo back for modelling. It's just a shame that we are in the middle of preparing to move house, so I am restricted in what I can do. The only problem I am having is finding that something I need to use is packed away in one of many boxes. Well, back to the Diamond T and an update on its progress.
I did a little jump on the order of build from the instructions. The next stage of build was meant to be the final bits on the chassis like fuel tanks, steps and the cab. But I decided to start on the cargo body instead, which is typical for me to do. Tried to assemble as par the instructions, but due to the overlength of the body cross braces, I opted to construct both sides and fix them to the body floor. It also helped to hold the braces in place once they were trimmed as there is no location pins on them. Advance warning to anyone planning to build this kit, be prepared for some swearing and cursing during this stage of the build!


After the braces are fitted, the tailgate and rear brace are fitted followed by the benches. These can fitted in either the down or folded positions, I did one of each for this build. Another little warning for you all here. Take care handling the cargo body whilst you are building it. The uprights between the body sides and the upper slats are very delicate, do not put any pressure against them because they will bend or break easily.

Along the side of the body, you will need to add some lashing hooks which have to be made from some bent wire. Make several extra hooks as you will lose a few to the carpet monster and you may not be happy with the shape of all of the ones you have bent up. In the first photo below, you will see that the rear mudguard is mounted to the extreme rear of the body, as show in the instructions and via the location holes in the floor. This position is incorrect as I discovered from looking at some side view photos of the real truck. The rear mudguards are meant to be the same distance from the rear brace as the front mudguards are from the front brace. They have also missed out supplying the support braces for them to. I also cannot understand why the rear guards are plastic, but the front ones are in etched brass!


As I was removing the rear guards to reposition them, they got slightly damaged along the joint area. So I had to repair these areas by using some Evergreen plastic strips sanding them to shape and size. Further strips of the plastic strip were used to make the guard braces so they would match the front ones. The mudguards are roughly 4mm from the inside faces of the end cross braces, as there is no reference points on the underside of the body to help you. I used the braces of the front guards to get the rough location of them and then transferred the measurement to the rear ones.


That is all for now, I will try and update further as I progress with the build. But I am not sure how much will get done over the next month as we approach the moving date which should be set later this week. So, until next time, happy modelling.
Monday, 6 October 2014
Mirror Models Diamond T 968A Cargo Truck WIP #2
It has been a productive week on the Diamond T. Had a couple of battles with the dreaded Carpet Monster, he won one and I won the other one. I just pray he doesn't raise his ugly head for a long while now. So, what progress has been done on the "T".
The chassis frame was assembled with a little confusion between the instruction diagrams and how the actual parts assembly together. This was on the front winch that sit between the chassis rails where the diagrams show the drive gearbox one way, but when you actually build it, it assembles the opposite way around. Not sure which way is correct, but the parts only assemble one way and not the other!

Said winch gearbox on nearer side of cable drum.

The rear suspension assembly is quite a detailed area of the chassis in this build. Once the main parts (ie. axles, springs and crossmember) are assembled, we start to add the brake actuators and the various bars that stabilize the axles from twisting. The following four photos show the detail of the rear suspension through it assembly over the last week.


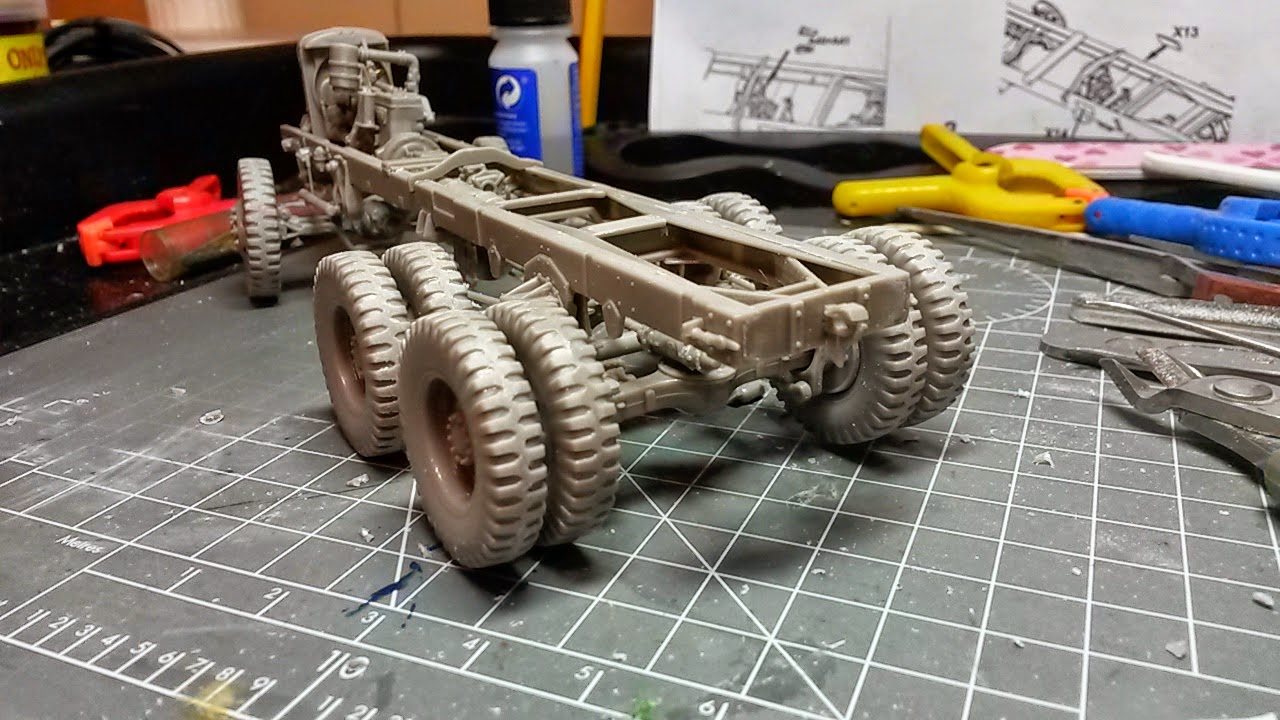
The next selection of photos are the latest from a couple of nights ago with the wheels, engine and radiator test fitted to see how they looked when they are glued in place. You will also see that the transfer box, handbrake and various prop shafts have all been fitted to the chassis. If you are building this model yourself at any point in the future, you might find that the propshafts are a little longer then the spaces they are meant to fit. I just trimmed the location points where the shaft UJ's mount onto the axles and transfer box. On the front axle, there is a small disc which fits between the UJ and the extension on the transfer box. Firstly, mine was eaten by the carpet monster, so I scratch-built a replacement, which once I tried to fit the prop shaft prevented it from fitting. So I removed it and the prop shaft went into position without any problems.




Whilst getting carried away with building the chassis, I forgot to check the upgrade set to see if there was any kit parts to be replaced from it. So, when I checked, to my annoyance I found there was a few parts to be replaced from it. The first were these bump stops which the plastic parts are replaced by some etched ones. There is also a couple of parts on the rear of the chassis to be replaced, but luckily, I have not put the plastic versions on yet.

Well, that is all for this posting. There is a few more parts to be added to the chassis, these include the rear engine mounts and the cradles for the fuel tanks. I think there are a few other items to be added to, but I am not sure what they are until I look further along the instructions.
The chassis frame was assembled with a little confusion between the instruction diagrams and how the actual parts assembly together. This was on the front winch that sit between the chassis rails where the diagrams show the drive gearbox one way, but when you actually build it, it assembles the opposite way around. Not sure which way is correct, but the parts only assemble one way and not the other!
Said winch gearbox on nearer side of cable drum.
The rear suspension assembly is quite a detailed area of the chassis in this build. Once the main parts (ie. axles, springs and crossmember) are assembled, we start to add the brake actuators and the various bars that stabilize the axles from twisting. The following four photos show the detail of the rear suspension through it assembly over the last week.
The next selection of photos are the latest from a couple of nights ago with the wheels, engine and radiator test fitted to see how they looked when they are glued in place. You will also see that the transfer box, handbrake and various prop shafts have all been fitted to the chassis. If you are building this model yourself at any point in the future, you might find that the propshafts are a little longer then the spaces they are meant to fit. I just trimmed the location points where the shaft UJ's mount onto the axles and transfer box. On the front axle, there is a small disc which fits between the UJ and the extension on the transfer box. Firstly, mine was eaten by the carpet monster, so I scratch-built a replacement, which once I tried to fit the prop shaft prevented it from fitting. So I removed it and the prop shaft went into position without any problems.
Whilst getting carried away with building the chassis, I forgot to check the upgrade set to see if there was any kit parts to be replaced from it. So, when I checked, to my annoyance I found there was a few parts to be replaced from it. The first were these bump stops which the plastic parts are replaced by some etched ones. There is also a couple of parts on the rear of the chassis to be replaced, but luckily, I have not put the plastic versions on yet.
Well, that is all for this posting. There is a few more parts to be added to the chassis, these include the rear engine mounts and the cradles for the fuel tanks. I think there are a few other items to be added to, but I am not sure what they are until I look further along the instructions.
Monday, 29 September 2014
Mirror Models Diamond T 968A Cargo Truck WIP #1
Here we go again with another magazine review build, the subject being one of my favourite military vehicles, the Diamond T. During my teens, I had built the Matchbox Diamond T Tank Transporter, and it seemed to wrangle its way to a little corner of my heart. To the point that I recently purchased the Revell release of the said ex-Matchbox rekindle that love of the truck. That was until I got the chance to build the new Mirror Models 1/35th scale Diamond T Cargo Truck, along with the upgrade set for a SMMI review build.
This review build has fortunately turned out to be the ideal project for me to do whilst we are in the process of moving. I can do all of the main construction and leave any painting until the end which should coincide with when we have moved and I have unpacked most of my modelling equipment and set up the new workshop. So, here is where I am up to so far.
First here is the engine supplied in the kit. Mirror Models have tooled up a nice example with very good detail. This engine looks better then some of the ones you find in the models cars of the 1/24th and 1/25th scales. Supplied on the etched sheet in the kit, is this lovely fan which just need the blades bending before being glued onto the pulley. There is potential for adding extra detail such a hoses and wires, but I will not be doing it on this build.


The front axle is next. As this is a 6X6 truck, naturally it is a driven axle which you can pose in a steered position. It does not mention this in the instructions and the steering arm that mounts on the chassis does have a small tab to locate it in the centre position. What I did was to glue one of the brake drum backplates in position, then using the steering track arm, get the position of the other drum and glue everything in place.


The wheels were all straight forward to assemble, but do not forget to run some glue around the inner joint on the wheel rims. I forgot to do this and still need to do this job. The instruction say to assemble the wheels onto the brake hubs, but I am leaving them off so that the hubs can be added to the axles separately from the wheels. Plus I want to paint the wheels individually to. You will notice there is twelve wheels in the photo, two of them are spare wheels which mount on the headboard of the cargo body.

Last for this posting is the radiator. This just needs a little bit of cleaning up on the joints prior to painting, mainly down the sides of the radiator. Believe or not, this is made up of five separate parts including the cap.

More work has been done since these photos were taken on Friday evening. One thing I have noticed with this kit is the lack of locating pins for the parts. What ones there are, tend to be fairly small and the holes they locate into are not big enough to accommodate them. I have had to drill these holes out slightly in both width and depth. But like the ICM kits I have built in the past, you have to rely on you eyes to ensure the parts are lined up and the right way around when gluing them.
I will post later on this week with further progress of the chassis.
Thursday, 18 September 2014
Kit Review Page Updated

Tamiya's great 1/24th scale kit of the Lotus Europa Special has been added to the Kit Review Page of this blog.
Subscribe to:
Posts (Atom)