Wednesday, 3 August 2016

Nissan R32 GT-R All Finished

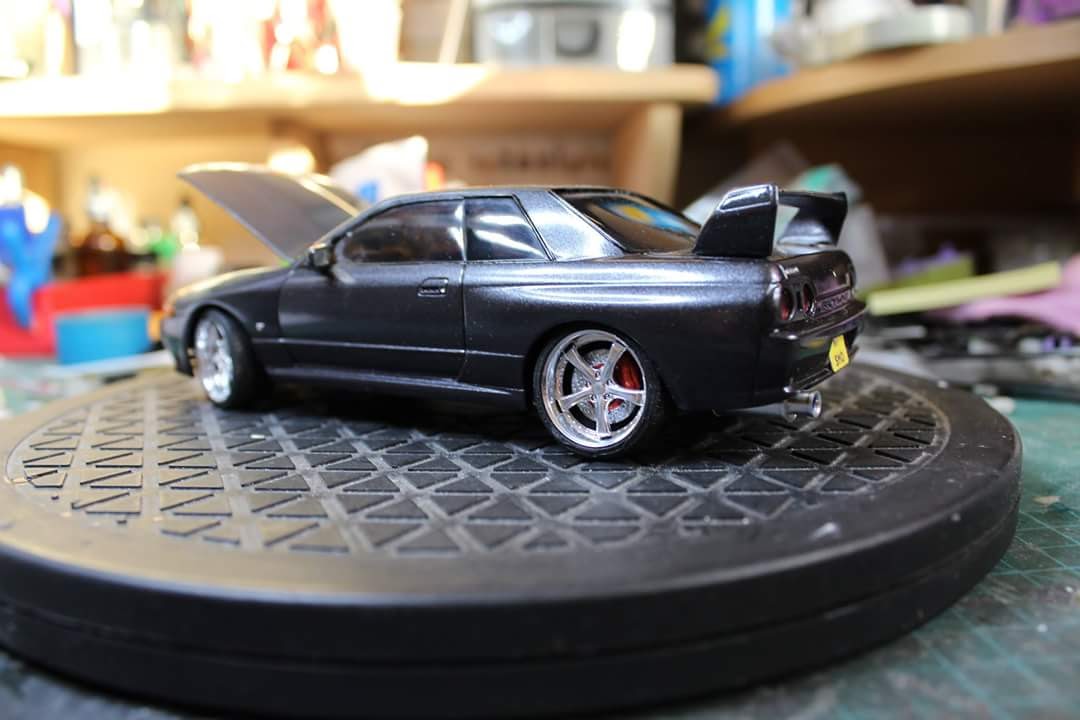
Sorry for the delay in updating the blog for the last month, but it has been a little busy at home and any spare time was spent at the workbench. But the GT-R has finally been finished, after a seven year wait. 

Even after all of this time sitting in the cabinet part finished, I am pleased with the finished model.  The few little changes that I did from the original plan, have improved my original vision of the project. The decision to have the bonnet open was the best way to go.  Adding the carbon fibre decals also gave a different look to. 

Anyhow, the GT-R is now finished, I am happy with the final outcome and it is back in the display cabinet. 


Friday, 17 June 2016

Nissan R32 GT-R "Going to finally finish it" WIP#3

Progress is rolling on with the GT-R and I can now see the light at the end of the tunnel with this project, even though it is several years further down the line then I planned. All of the alterations to the engine bay have been done, including the repairs to the cracked filler around the bulkhead. This has now been primered and painted in the body colour along with the underside of the floorpan. Luckily, there was just enough paint left in the rattle-can for me to re-paint these areas via the airbrush.
Once the chassis section was finished, I moved onto painting the engine, exhaust system parts and engine bay components. Everything was given a couple coats of Alclad primer prior to painting the items in their relevant colours. I first airbrushed the whole engine with Vallejo metallic black as the base colour for the main block. Next I hand brushed the rest of the individual areas in the various colours I had chosen for the engine. Some parts i was not happy with how they looked, so I then re-painted them a different colour to improve the look. The exhaust system was brush painted with steel colour with the centre box painted in gunmetal. 


Once the engine painting was finished, it was glued in position followed by the exhaust system parts underneath.The turned aluminium rear muffler had the inner surface painted blue, then the back of the opening painted black to make it look like the dark inside of the real thing. The engine bay items were now all fitted after they had been painted, just leaving the hose from the radiator to the engine block to be done. The one from the engine set was too small to fit this engine, so the main hose section was cut off and a new one fabricated from some plastic rod. After several attempts, I got a new shaped hose to fit and the two parts were joined together then fitted inside the engine bay.

I next test fitted the body and interior to make sure there was no problems of fitment since the engine was fitted. Over the past few days, I had been thinking about gluing the bonnet in the open position rather than having it opening and closing. The hinges still needed some adjustment for the bonnet to shut properly, so this swathed me in the direction of gluing it in the open position permanently.


Now we come up to the current stage of the project. These photos were taken a couple of nights ago once the final assembly had finished. The roof liner needed a littler repair done to the panel I had inserted in the glazing section. I also made a couple of sun visors to finish off the lining and cover the two locating pin holes at the front. So once the glazing was glued in place, the visors, interior mirror and wipers were all glued in place. The rear light clusters were also glued back in place after giving them a clean up and replacing the Bare Metal Foil on the backs of them. 

Now that the hinges were glued in the open position, they were both painted black before fitting the body back in place. The final things I did to the body before fitting it was to re-paint the badges on the rear and side of the body. As soon as they were dry, the body was fitted and the bonnet placed onto the hinges. I am still wondering whether to glue it on, or leave it loose in case I need to remove it for some reason later down the line.

All that needs to be done now is finish off some detail painting and add the front light lenses. The model will then have some of my printed number plates added to finish her off. My R32 is almost finished, finally after all these years. The next post on this project will be of the finished model in a few days time.


Wednesday, 8 June 2016

Nissan R32 GT-R "Going to finally finish it" WIP#2

Work has progressed over the last couple of weeks on the GT-R, apart from a little interruption of a new four legged member to the family. We decided to get ourselves a cat a couple of weekends ago, it has been a long while since we lost of last one and we decided it was time t get another. So meet Winston, we got him through the RSPCA and he is about 9 to 12 months old. So the training to keep him out of my hobby room has begun!

  
Now that the introduction to Winston is out of the way, on with the GT-R.

As the engine position has been sorted out, I started to make up the exhaust system for the model. First I made the downpipes from the turbos out of plastic rod, heated up with a hairdryer and bent to shape. Once I was happy with them and they were glued onto the turbos, I continued with the front section from the downpipes to the front box and rear section to where it goes over the rear axle. These were made from some thicker plastic rod and shaped by the same method as the downpipes. 


Somewhere in a box, there is a turned aluminium rear muffler, but where that box has been hidden since the house move has baffled me. So it was time to get the mini lathe out and turn up a new one. My first attempt came out too small, so a second attempt was done using larger diameter aluminium rod and after a couple of hours work, success. A new muffler that looks better than the aftermarket one I have got (somewhere!).


In the underside of the body, there is a hole for the plastic kit muffler to locate in. So I drilled a hole in the new muffler, glued a piece of brass wire in it and this just locates in the same hole. To finish this section of the exhaust off, I used another piece of plastic rod, bend and filed it to shape and size. Then drilled holes in the end of the rod and middle of the back of the muffler and glued together. Exhaust system all finished apart from a few minor adjustments to be done later. 


As was said in the last post on this project, the bonnet needed to be resprayed due to a sink mark in the paint. I was also toying with the idea of using some carbon fibre decal instead of painting. The carbon fibre decal was the path I chose to take, not just on the bonnet, but on the rear spoiler and fuel filler flap to.

Both outer and inner surfaces of the bonnet received the carbon fibre treatment then was given a coat of gloss clear to seal it. I also gave the body a couple of coats of clear as this was looking a little dull from the original clear coats. I will give the body a couple more coats of clear before it is finished. Now I have to turn my attention back to the chassis and repaint the engine bay, then the engine, exhaust and other parts of the engine before final assembly begins.


I think Winston is either trying a sneaky way of slipping into my room to get to the window ledge, or he is interested in taking up model building. We will have to wait and see!


Any comments on this and any other projects are welcomed.

Tuesday, 17 May 2016

Nissan R32 GT-R "Going to finally finish it" WIP#1

Now, I guess some of you will be wondering why there are photos of a finished model of a Nissan GT-R posted below. Well the answer is simple, I never finished this project. Externally, she looks finished, but I never got around to fitting the engine, exhaust and engine bay detail.

A brief run down of this project. The kit is an Aoshima Skyline R32 GT-R from the "Street Tuning Drift Machine"range. Now, these kits are kerbside only, but Aoshima did produce an engine detail set for their R32's. But this was not good enough for me so I cast myself some RB26 engines from the Tamiya engine out of their R32 GT-R, solely for use in the Tamiya R33 and R34 GT-R's. So I decided to fit one into this model to but.


Work had started by cutting away the bonnet from the bodyshell and the lower engine detail away from the chassis. I had also made a bulkhead wall and front brace in the engine bay and painted it. But that was as far as I got with the project. Now, eight years down the line, I decided it was time to finally finish the GT-R off.

The first thing to sort out was the hinges for the bonnet to open and close. This was done over a few evenings, then after several attempts, I managed to get the to hinges work how I wanted them. There is still a little adjustment to be made to allow the bonnet to sit in the closed position properly.


Next I needed to redo the front strut housing tops as the filler that covered them had cracked up. So I cleared the filler away and scratch-built some new parts out of plasticard to replace the missing detail.


Now I could finally get the engine mounted in its position and then start adding the front pulleys and fan to find the location for mounting the radiator. This needed some modifications done to allow it to sit low enough to clear the bonnet and let the engine sit correctly. Work continued with adding the front differential unit after some chopping around of it.

The turbos were next in the order. Once they had been cleaned up, the two halves were glued together and the mounting holes in the engine block were drilled out for the pins to go in. Unfortunately, I did not have any of the inlet manifolds cast up, so I used the one from the Aoshima engine set instead. I am also planning to use other items from this set to finish off the engine bay to save me having to scratch-build the parts. So this is as far as I have got now. I just need to sort out a few more things in the engine bay before it gets re-painted. I think I will paint it white this time, just to show the engine better.


The following photos show how the GT-R looks with the bonnet open and engine in place. There is a bit more work to do yet, but I hope to have this finished in the next few weeks. The bonnet needs respraying as there was a mark in the paint right in the middle of it. But I am toying with the idea of using some carbon fibre decal on it instead.



Land Rover 7 Ambulance Finished

Well, another project finished within a few months of it starting. I am getting a bit of a habit completing a project soon after it has been started over the ladt year. 

The base was the final stage of this project to complete, and the end result was quite satisfying. Once I was happy with the flow of the terrain, I worked out where there was going to be areas of soil showing through and painted them. Next it was to cover the remaining areas with various grass scatter using PVA glue to stick it down. Some earth pigment was used on the exposed soil to match the dust on the Land Rover. 


To finish off the diorama, the figures were glued in place followed by the Land Rover on the lower area of ground. 


Taking into account the age of this kit, it built up very nice and without any problems. Even the decals were still okay with only a slight crack appearing on the largest one. Fair enough, the figures are not up to today's standard of tooling, but these could always be replaced by newer aftermarket ones. In all, I am pleased with the end result and wait to see the response at its first outing at a show.