
So the first thing I had to do when restarting this project, was to finish painting the cockpit interior before adding the etched panels, seatbelts, etc. Once these items were added, the interior was assembled as can be seen in the four photos below. The detail of the pre-printed panels and seatbelts is great and saves you from painting these yourself.


Prior to fitting the cockpit interior to the fuselage, two glazed panels had to be added to the fuselage with two etched braces. When this was done, a instrument panel was painted and fitted to the side before the cockpit section was glued in place. This located on ledges for the floor and two pins each side of the tub, making a sound and solid fit. The fuselage halves were glued together trying to get the joint as clean as possible, but this was not helped by the lack of location pins on the fuselage halves.
The wings in this kit are very good when it came to assembling them, there was no hitches and the moulded detail is excellent. I noticed as I was fitting one of the main wings that a gun had been broken off at some point in the box. So I hope that it is still in there for it to be glued back onto the wing. The location of the wings to the fuselage is wonderful, they just sit very snugly into recesses in the fuselage and I just ran some liquid glue into the joints. Absolutely no trouble at all, I have never had wings go onto an aircraft this easy before. The rudder comes as a separate part from the tail and I have positioned it slightly turned. The kit has a choice of three engine cowls to suit which of the five choices of aircraft you are doing in this kit. This will not be glued onto the fuselage until after the painting is done and the engine is fitted.

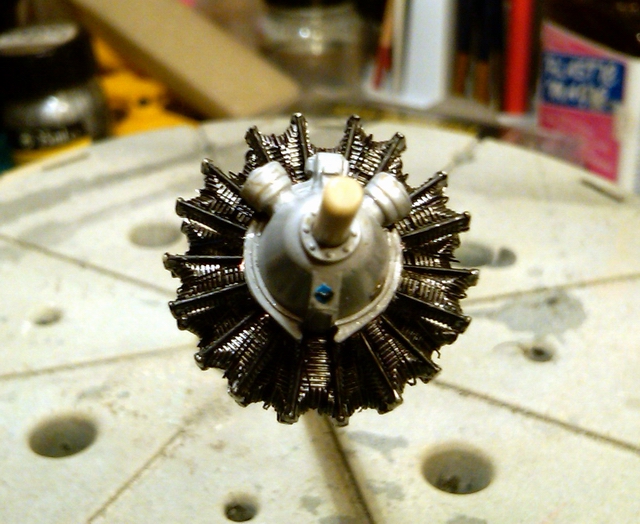
Now the engine comes as two banks of radial cylinders with etched detailing, of which some is fiddly to get into position on each cylinder. Not something to attempt when you are tired like I discovered, causing me to save it until the next day to finish. But the end result is worth it when I completed it. I used Mr Metal Color's Aluminium paint on the cylinders and weathered it with Mr Hobby's Oil Effect paint. A little more weathering is still to be done before it gets glued onto the fuselage after painting. Here is the final photos for todays blog showing the engine assembly. More updates soon on this project.


No comments:
Post a Comment