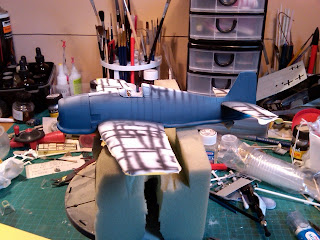
Well, it's been a week or so since I updated this project, so this is where I am up to so far. I have got the main construction and I test fitted the main undercarriage to see how she looked. Even without any glue, it supported the fuselage without any movement from the struts. It is nice to get the feel of how it looks when it's finished. At this stage, I have been very please with how the kit has gone together. Lets hope my two FW190's, Bf110 and 1/72nd B-24 go together in the same way!
Once the cockpit was masked off, I gave a coat of primer to check for any gaps, etc. Once they were sorted them out, I then sprayed a final coat of primer and then did some pre-shading along the panel lines. This is my first attempt at weathering using this method, so it's going to be trial and error for me. I just used Tamiya's Matt Black for this, but next time I will mix a more subtle colour for it.
After several light coats of Mr Hobby's USN White (H316), it looks like this. The photo shows up the pre-shading more for some reason, but in the flesh it's more subtle. With some weathering at the end of the build, it will tone it down some more.
Another first for me, masking with Blutac. Never tried it, kept meaning to, got plenty of Blutac in the draw, so here we go. I have seen it done on plenty of other people's models in the past and liked the end results. So I decided it was time for me to attempt it. After masking the underside of the wings, I placed the Blutac sausages along where I wanted them to go and finished masking with some tape. I used Mr Hobby's Intermediate Blue (H56) which only needed a couple of light coats to finish. I am going to wait until the Navy Blue is done before I see the end result of my masking. So it is fingers crossed until then.


No comments:
Post a Comment