Monday, 23 April 2012

P-47M Thunderbolt "Wolfpack" WIP #02

Just a quickie to bring you up to date on the Thunderbolt. 

Over the weekend, I got the cockpit interior painted and assembled ready for fitting into the fuselage. I used a combination of the instruction colours and reference from actual aircraft photos, which showed some discrepancies to the instruction sheet. So I modified my painting to match the photos on the required areas. 

The kit supplies a set of decals for the dash, but I was not happy with how they looked and opted to hand paint the dials using reference photos again. I started to dry-brush the dials and switches first with Aluminium, then painted the required colour on each dial afterwards. I finished the dials off with a drop of gloss clear to look like the glass on each dial.

Before assembling the cockpit, I added a few data plates in a few places in the cockpit. The seat is not fitted in place yet as I am waiting for a set of Eduard seat belts to be delivered for it. More updates on this model plus the Hellcat and 49 Mercury soon.


Monday, 16 April 2012

49 Mercury Custom WIP #3

Progress has been a bit slow on this project over the last few weeks. So over the weekend I thought it was time to catch up on the project. The chassis was finished with the clean up on it and had the front and rear suspension fitted. After some primer, it was given a couple of coats of Mr Hobby's Metal Black. This seemed to be an appropriate colour to go with the planned body colour I am going to use.


The bodyshell and lower body section were given a coat of primer to show up any scratches or sink marks on them. The only part that had any problems was the underside of the bonnet where the four ejector pin marks still showed. The underside was given a couple of coats of the chosen body colour, just to see how it looked. I am doing the car in Palladium Silver which I brought to do my Mercedes Benz McLaren SLR 722 edition in, but I decided to use it up on this model as it was evaporating from the container. I think the colour has changed slightly, but this will be not trouble on this project.


The bonnet has had the pin marks refilled with Mr Surfacer 500 and wet sanded, then received another coat of primer tonight. The bodyshell has been wet sanded already and will be sprayed once the bonnet is ready too.


I decide to paint the engine block and transmission in Metallic Blue, as I think this will also go with the body colour. Now it is onwards with the engine building, painting and detailing getting that completed so I can put it aside for safety. So here are a few new photos of this projects progress until the next instalment.


F6F-3 Hellcat WIP #3

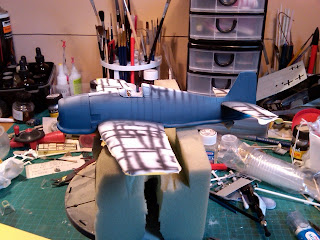
Here is a little update on the Hellcat. The main painting has been done to the fuselage. My first attempt at using Blutac for masking, has been, in my opinion a success. The soft edges between the three colours of the camouflage look alright, so now it will be just for me to perfect the technique. 


Next I have to paint the cockpit canopies, clear the fuselage prior to adding decals, finish the undercarriage and engine. Then onto weathering and final assembly, hopefully to another pleasing model. So here are a couple of new photos to finish this short update.


P-47M Thunderbolt "Wolfpack" WIP #01

Here is the first instalment of the Thunderbolt project. 


So far, all the work that has been done of this project is whilst I am at work. This is just construction for now of the cockpit and the main wing sections. The cockpit is at the paint stage now before any more construction can be continued on it. So until I do this, work will continue on the main wings getting towards the painting stage of the undercarriage bays. 


Once the wings are done, I plan to start on the engine getting the main sections built ready for painting and detailing. Then I will carry on to the next parts of construction while sitting around at work, then what painting I can do there. So here are the first few photos for you.


Saturday, 14 April 2012

Automodellismo 2012


The majority of shows I visit through the year, are large one with the biggest being the IPMS(UK) Nationals held at Telford each November. But every so often, along comes a nice little show what is a joy to go along to.


Automodellismo is a show based around automotive modelling, so don't expect to see any aircraft and armour here, just cars, bikes and trucks. Outside, there will be a selection of cars visiting the show for most of the day. The other great thing about this show, you are not spending the day walking around loads of trade and club stands as it is held at a village hall. Meaning you can spend more time at your stand getting on with some modelling. But there is always the temptation to buy something, so I will try and behave myself. And to my darling wife upon my return home on Sunday evening, "It was Richards fault!".


So, if you are at a loose end this Sunday and not too far away from Milton Keynes, the show is about 15 minutes drive from junction 14 on the M1. If you do visit the show, pop along to the Milton Keynes Scale Model Club stand and say hello.


Automodellismo 2012 Webpage

Wednesday, 11 April 2012

New Project: P-47M Thunderbolt "Wolfpack"

The trouble with my job, is that I can spend a few hours a day sitting around on loading bays waiting to be either tipped or loaded. So I either take my laptop to do some work on, or a model to build. But there is only so much I can do on a model in my cab. This is things like main construction work, bits of painting and general cleaning up of parts. The jobs like spraying and delicate construction are out of the question and they are done in my workshop.


So back to this blog. 


All of my other ongoing projects are at stages where it will be hard for me to do in my cab, i.e., spraying, detail painting and delicate assembly, etc. So a new project was needed to fill this gap. After a few days of looking through my vast stockpile of kits, well, the database, I decided to take this one to start on. 


It is Hasegawa's 1/32nd scale kit of the Republic P-47M Thunderbolt of the 56th Fighter Group "Wolfpack". What can I say, it is a lovely kit from my first impressions. The mouldings are clean, minimal mould lines and flash to clean and great detail on the parts. In truth to the matter, a great kit and I could not wait to get started on it. And that happened today.


So far, I have done the basic assembly of the cockpit and the main undercarriage bays up to the point of painting them. Once I have taken some photos, I will start a new blog for this project over the next couple of days.

F6F-3 Hellcat WIP #2

Well, it's been a week or so since I updated this project, so this is where I am up to so far. I have got the main construction and I test fitted the main undercarriage to see how she looked. Even without any glue, it supported the fuselage without any movement from the struts. It is nice to get the feel of how it looks when it's finished. At this stage, I have been very please with how the kit has gone together. Lets hope my two FW190's, Bf110 and 1/72nd B-24 go together in the same way!


Once the cockpit was masked off, I gave a coat of primer to check for any gaps, etc. Once they were sorted them out, I then sprayed a final coat of primer and then did some pre-shading along the panel lines. This is my first attempt at weathering using this method, so it's going to be trial and error for me. I just used Tamiya's Matt Black for this, but next time I will mix a more subtle colour for it.


After several light coats of Mr Hobby's USN White (H316), it looks like this. The photo shows up the pre-shading more for some reason, but in the flesh it's more subtle. With some weathering at the end of the build, it will tone it down some more.


Another first for me, masking with Blutac. Never tried it, kept meaning to, got plenty of Blutac in the draw, so here we go. I have seen it done on plenty of other people's models in the past and liked the end results. So I decided it was time for me to attempt it. After masking the underside of the wings, I placed the Blutac sausages along where I wanted them to go and finished masking with some tape. I used Mr Hobby's Intermediate Blue (H56) which only needed a couple of light coats to finish. I am going to wait until the Navy Blue is done before I see the end result of my masking. So it is fingers crossed until then.


Wednesday, 4 April 2012

F6F-3 Hellcat WIP #1

I brought this Eduard 1/48th scale kit of the Grumman F6F-3 Hellcat a couple of years ago now during a phase of buying a selection of Eduard WWII aircraft. I first started this kit early last year, but put the project on hold until a couple of weeks ago. Up to that point, I had so far assembled the wings assemblies, main engine block and the basic cockpit interior, minus the etched detail for the panels.


So the first thing I had to do when restarting this project, was to finish painting the cockpit interior before adding the etched panels, seatbelts, etc. Once these items were added, the interior was assembled as can be seen in the four photos below. The detail of the pre-printed panels and seatbelts is great and saves you from painting these yourself.


Prior to fitting the cockpit interior to the fuselage, two glazed panels had to be added to the fuselage with two etched braces. When this was done, a instrument panel was painted and fitted to the side before the cockpit section was glued in place. This located on ledges for the floor and two pins each side of the tub, making a sound and solid fit. The fuselage halves were glued together trying to get the joint as clean as possible, but this was not helped by the lack of location pins on the fuselage halves.


The wings in this kit are very good when it came to assembling them, there was no hitches and the moulded detail is excellent. I noticed as I was fitting one of the main wings that a gun had been broken off at some point in the box. So I hope that it is still in there for it to be glued back onto the wing. The location of the wings to the fuselage is wonderful, they just sit very snugly into recesses in the fuselage and I just ran some liquid glue into the joints. Absolutely no trouble at all, I have never had wings go onto an aircraft this easy before. The rudder comes as a separate part from the tail and I have positioned it slightly turned. The kit has a choice of three engine cowls to suit which of the five choices of aircraft you are doing in this kit. This will not be glued onto the fuselage until after the painting is done and the engine is fitted.


Now the engine comes as two banks of radial cylinders with etched detailing, of which some is fiddly to get into position on each cylinder. Not something to attempt when you are tired like I discovered, causing me to save it until the next day to finish. But the end result is worth it when I completed it. I used Mr Metal Color's Aluminium paint on the cylinders and weathered it with Mr Hobby's Oil Effect paint. A little more weathering is still to be done before it gets glued onto the fuselage after painting. Here is the final photos for todays blog showing the engine assembly. More updates soon on this project.